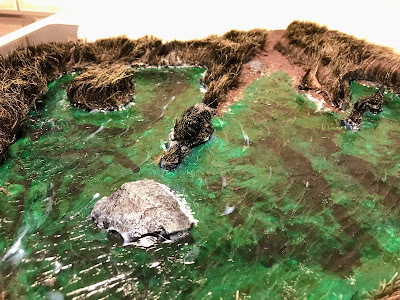
Improv scenery time - some big ponds!
For this, you will need:
- Some plastic tablecloth
- Some fake fur fabric
- Glue
- Sand
- Paint
- Water Effects
- Patience
My fake fur fabric was a swatch of thick, sasquatchy stuff I'd used to make a prop for a play a couple of years ago. It's a nice hairy dark brown, and looks pretty convincing as fur. Maybe not so much as grass? Wrong colour and density, but close enough for my purposes.
I did have a go at dyeing it, trying to bleach it blond and then maybe stain it a greener or lighter colour, but it seemed pretty immune. Even soaking it in neat bleach overnight had no effect at all, so I just decided that this is some kind of alien reed bed, and that explains everything.
So I cut a donut of the fur out, stuck it on to an oval of plastic tablecloth with the glue gun, then did a layer of PVA and sand. Then another layer after that had dried - this fur has a foam rubber backing that makes it sit higher than the base, and that needed a bit of cover.
 |
| Just the paint here. The tablecloth had been folded in a cupboard for ages and I couldn't get the crease out, so eventually had to stick some plastic board underneath and gluegun it down. |
Next - painting it, so brown paint over the sand and a mix of dark blue and green for the water. Once that had dried (more patience), various dark green and brown inks over for a nice splotchy effect.
The water effects were the next bit, and this took a lot of patience. Each layer takes at least 24hrs to dry, somehow more in the fairly extreme heat we've had recently. I was using Vallejo Still Water and Water Effect Gel; the two smaller ponds just had the latter in two layers over the paint, but the biggest pond got a pour of Still Water.
Vallejo Still Water didn't impress me. It took ages to dry, nearly three days, and cracked as it did so. Without the gel over the top, it would have looked bad. It is at least cheap, at about twelve quid for 200mL, and works fine on small coverage like bases. The spare liquid and the gel also got used up going back over some older pieces - jungle pools and sewage farms, where I tried various rippling and splash effects, to varying degrees of success.
The technique I settled on in the end was using my finger, wrapped in cling film, to smear waves across the surface. Came out smoother than using a brush or a spatula, and was more fun! But a little prone to getting the gel into the fur, which is why some patches are a bit spiky-looking.
 |
| I can put my old Hobbit boardwalks on (more gangplanks to come in the further future...), and they look good in place. |
 |
| Dramatic battle vista, spoilt somewhat by the kitchen knife rack |
Not perhaps super professional looking (the reeds in particular look somehow not quite right, especially close up), but I am very pleased with these. Cover lots of tabletop, work fine with my existing frosty bogs, especially if I decide to go back later and do a bit of snow over the dirt, and will make a nice backdrop for walkways or battles in due course!
 |
| There are three bits in total so far - a small round pool... |
 |
| ...this smaller puddle... |
 |
| ...and the big pond, which is about a foot square. |
As I was rooting around in one of my terrain tubs, my eldest daughter grabbed something from one and cried out in tones of great moral outrage "Daddy! You haven't painted this bit!" I could only apologise. Somehow, I'd missed a few bits of dungeon scatter from earlier in the year, and immediately set to work remedying that. So here is a guillotine, a whetstone and an armour stand, and I can assure you all I've learned my lesson about bragging over an empty paint queue.
 |
| I went back to my sewage works and had a go at some splash and ripple effects, here seen just after they'd gone on... |
 |
| ...and about 48hrs later, with a little white paint dabbed on here and there to catch the wave crests. |
Next - who knows? Maybe some 40k again?


Absolutely fantastic scenery effects.
ReplyDeleteThey do look great! And very nice photography I have to say
ReplyDelete