

General Kas has obtained some shiny new toys, and has a challenge battle coming up. Time to get some practice in, and I, Kraken, have volunteered as sparring partner!
Keellar Knightlies
Imperial Knights for me! Not an army I know much about, other than due respect and fear for their size. Knowing Daemons would be my foe, I did a bit of research and tried to take something I thought would work.
Lots of stuff to pick from, which feels nice in a list with relatively few model choices! I took the Imperialis vow for an extra +1 to advance and charge (which I promptly forgot), House Mortan for a +1 to hit in the first round of combat (useful against Be'lakor's shadowy form) and its excellent strategem (1 CP to ignore all modifiers to shooting for a turn, and a very appropriate name for this fight - Slayers of Shadows).
Then a relic for the warlord which makes him the equivalent of 10 ObSec models (a bit like the Phantom calling on the power of ten tigers) and a very good trait that makes him -1 to hit in melee, as well as draining an attack from vehicles or monsters within 1".
All that done, I filled out the list with a pair of knights (Errant for punching and flaming death, Warden for chainy and shooty death) and four Armigers, a brace of each flavour. The Helverins will hang back and shoot, the Warglaives will run interference for the big guys, is the plan. But I'm mostly going to try and enjoy my full whack of CPs for some of the very entertaining looking Knightly Strategems!
- Lord of War - Knight Errant with Thunderstrike Gauntlet, Thermal Cannon, Heavy Stubber, Twin Icarus Autocannon, Warlord with Strike and Shield trait, Banner of Macharius Triumphant relic
- Lord of War - Knight Warden with Heavy Stubber, Reaper Chainsword, Avenger Gatling Cannon with Heavy Flamer, Twin Icarus Autocannon
- Lord of War - 2 Armiger Helverins
- Lord of War - 2 Armiger Warglaives
La Be'lle Dame Sans Merci
Kas has done an utterly lovely paint job on the big boy, so it's a pleasure to be up against the new incarnation! A familiar selection of daemons accompany him, offering boosts via their daemonic loci if within range thanks to his exhaustive selection of Marks.
Amongst these is a towering Exalted Keeper of Secrets. Kas rolls his bonuses randomly for these, as they're all so good that having two rather than picking one is well worth it. I forget precisely which boons it gets, but it's even harder to hit than usual as well as being harder to kill. All good news.
There's also a ton of troopy chaff that I'm going to have to chew through before I can claim any objectives off this lot. And lots of them are those pesky Tzeentch types with their high ward saves. Overall, I rate this 'scary' - do I point the firepower at the troops and try and clear the field at the risk of being nobbled by huge monsters, or aim for the bosses at the risk of losing the field?
Daemons of Chaos Slaaneshi Patrol Detachment
- HQ - Be'lakor with Blade of Shadows and Terrifying New Model
- HQ - Exalted Keeper of Secrets, Warlord with Mesmerising Aura, Witstealer Sword, Sinistrous Hand and Snapping Claws, Battle Rapture and Blessings of the Dark Prince
- Troops - 10 Daemonettes
- Troops - 25 Daemonettes with Icon, Instrument and the Rapturous Standard
Daemons of Chaos Tzeentchian Patrol Detachment
- HQ - Fluxmaster
- HQ - Fluxmaster
- Troops - 8 Brimstone Horrors and 2 Pink Horrors
- Troops - 8 Brimstone Horrors and 2 Pink Horrors
- Elites - 7 Flamers
- Fast Attack - 3 Screamers
- Fast Attack - 3 Screamers
Mission and Terrain
Open War!
The draw of three cards gives us an objective called Stand Off - three objectives, one in the middle, one in each deployment zone. 1 VP for your own, 2 for the middle, 3 for the opponent's one, scored at the end of a turn.
The deployment zone is the circle in a diamond one, so Kas chooses to be surrounded (and thus get two objectives to hand, effectively). This is balanced by the Twist, Unstable Reality. -1 to all Ld, -1 to all combat attrition tests - it's a pain for the Daemons but doesn't really bother Knights in the least. Hurrah!
We were going to redraw the deployment, but thought we'd let the cards dictate the story, and given the twist impacting daemons most, they should be the defender in the centre.
So this is a valiant last stand as the Knights of House Mortan close in and attempt to shut down the last dregs of a Daemonic Incursion. Some new painted terrain in the collection here, the lovely Warzone Charadon buildings along with the Necromunda Gang Hideout!

Deployment
Kas takes the middle, and sprawls out across it, big daemons pointed towards the corners in case a first turn comes his way.
I fill out three of the corners - the Helverins guard my home objective, the Warden goes alone opposite Be'lakor and the Errant squares up against the Keeper of Secrets, flanked by the Warglaives.

First turn goes to me!
I'm reckless, not daft.
Knights Turn 1

The Warden heads for Belakor, but doesn't quite get close enough to unleash the full hell I'd hoped for. In fact, much as I feared, he can't even scratch Mr Shadows despite using Slayer of Shadows to ignore the hit penalties, and then fails his charge. I'm not totally sorry there, I'd much rather shoot him away than fight him!
The Helverins throw Thin Their Ranks into the Daemonette cluster, maxing out the shots from one set their cannons, and that mows the dancers down to half numbers. Then the nearest one charges them to lock them in place, stomps out a few more for the cost of half of its own wounds, and several more finally pop in morale thanks to the shifty state of local reality.

But the big action is seeing the Warglaives and Errant storm straight into the Keeper of Secrets, burning eleven wounds off it with melta lances, then finishing it with a punch to the head from the Warlord's fist. The Errant ties up the Horrors, the Warglaive leaps on the Flamers, and that's a splendid first turn from my point of view!
Ow
Objectives scored: 1 for home objective
Daemons Turn 1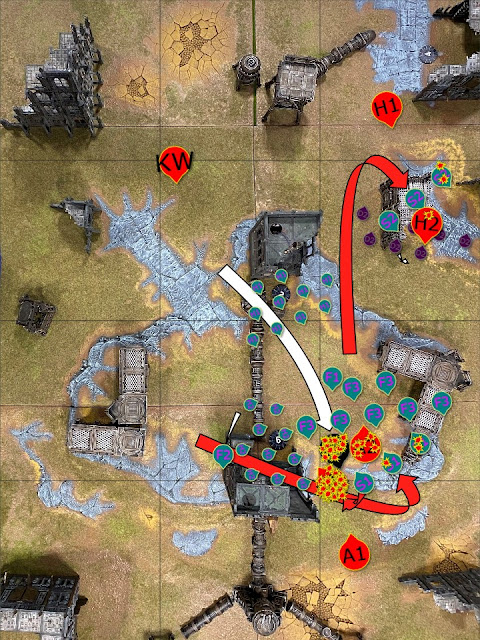

With losing the KoS I opt to bring Belly back from his flank to support the other daemons, he will have to show them what to do, and did not fancy leaving the centre open for the knights' stomping.
One set of screamers goes to help the daemonettes, whilst the other along with flamers plans to defend the south.
In psychic I manage to boost Belly's toughness, reduce the big knight's melee effectiveness, and force the warglaive into fighting last.
My only shots from the flamers melt a little of the warglaive ready for a screamer assault.

The screamers are chipping away wounds on warglaives and helverins, but not enough to threaten them seriously yet. The daemonettes don't hurt much, but when they hurt it rips through the armour, so although they are dwindling, they are scratching the paint.
For the big fight, we both have tricks.
The Errant has been slapped with a spell that reduces its AP and Strength, plus Be'lakor is generally hard to hit or wound even when he isn't extra tough. I'm also hurting him, though - my Mortan House trait gives me +1 to hit as the fight start, which cancels out the minus, and my warlord trait gives him -1 to hit and knocks off one of his attacks. It's a pretty even fight, overall.
Although I fail several attacks, there is some pain brought on to the big knight.
Yeah, 16 wounds of pain!
However two big face slaps and I am down 12 wounds, then the knight tries to squeeze me with his claw (he fails).
Death Grip! It's a great strat, but you can't squash a shadow.
But I am Khorne (and every other keyword) and so pull out the 3cp fight again strat and lance the big knight through with shadowy sword.
At which point I valiantly try my best to explode, using more strats to overload my plasma generator. But it's not to be, and the sword strikes home before I can pull the trigger! Good fight!
Objectives scored: Middle and home, 3At which point I valiantly try my best to explode, using more strats to overload my plasma generator. But it's not to be, and the sword strikes home before I can pull the trigger! Good fight!
Knights Turn 2

If the warlord's dead, he very nearly took Be'lly there with him. Can I close the deal?
The Warglaives move into position as the Warden storms the centre. Belligerent Machine Spirit turns his gatling gun into a short-range flamer, which utterly melts its way through the Horrors on the central objective. His other guns take a little off a nearby Fluxmaster and then fail to connect with Be'l, but he has his own problems - the approaching Warglaive bounces off his ward save, but then charges in, revving its chainblade.

The Helverin slowly stomps its way through Daemonettes, but takes more wounds as it does so. Its pal can't see Belakor (obscuring terrain), but helps finish off the Horrors from distance. Alas, the Warden can't find a path to charge through to the middle, there's no space for his big feet.
Be'l's Spells are still keeping one Warglaive in last place, but he has to weather the attacks from the newcomer. Which he does - his extra toughness really helps shrug off the heavy attacks. Flamers and Screamers bring down the wounded Warglaive before it can move, and Be'l himself kills the other one. Almost! It's left on a single wound, and no amount of rerolls can quite finish it, so the Prince of Shadows is stuck in combat.
Daemons Turn 2
 |
| Map error - the horrors didn't move up to the middle until next turn |
I decide to drop Belakor back and hope to finish the second armiger with screamers, smite or flames and will risk a turn hiding before coming back in. It takes all of them to pull it off, but the warglaive does fall.
He sneaks through a round of smites with another strat - in the end, it's the flamers that bring him down with sheer weight of fire.
The Helverin slogs its way towards the end of the combat - the Daemonettes don't make it out, but neither does the Armiger. Two Screamers are left. (I left it on the map for an extra turn, erroneously)
I suddenly remember about my 10 daemonettes in the warp; they will have to arrive in turn 3.
Objectives scored: 1 for Home
Knights Turn 3

The Warden is my main hope here. More angry machine spirits - the second Horror unit takes the brunt as I attempt to murder away the scoring units, but there's enough to kill the nearby Screamers as well as finish off a Fluxmaster. The remaining Helverin kills off the Screamers that finished its mate, but it can't quite see other useful targets from the ruins.
Sadly, Belakor once more avoids death, and even if I manage to grab the middle objective (remember, those Horrors are really further south for now), I haven't finished off their unit. Kas uses the Pink Horrors and their better save to do some impressive work, and after morale there are still three left (all rolled on camera, but seven 4+ saves in a row), enough to easily steal the objectives from me. All the same, I'm just ahead for now.
Daemons Turn 3 

It's close on objectives, and I do have more units, and I am going to remember my daemonettes. I am going to have to run between objectives though. As hinted in turn 2 my horrors advance from between my central objectives and the flamers jump into their evacuated spot. The fluxmaster places himself between the flamers and the knight and belakor approaches for an easy charge too.
I manage to give myself the chaotic free reroll in the psychic phase, and tickle some wounds in shooting. The Bellakor and the herald charge in (herald first to entice the overwatch).
The daemonettes need to roll a nine from their hidden position, one dice comes up 5, so use the fated dice to reroll the second; but still fail.
It's close, and I spend most of my CPs to fight twice, but with my reduced attacks too, the big knight is dropped to his bottom bracket but lives on with 2 wounds.
Objectives scored: 3
Knights Turn 4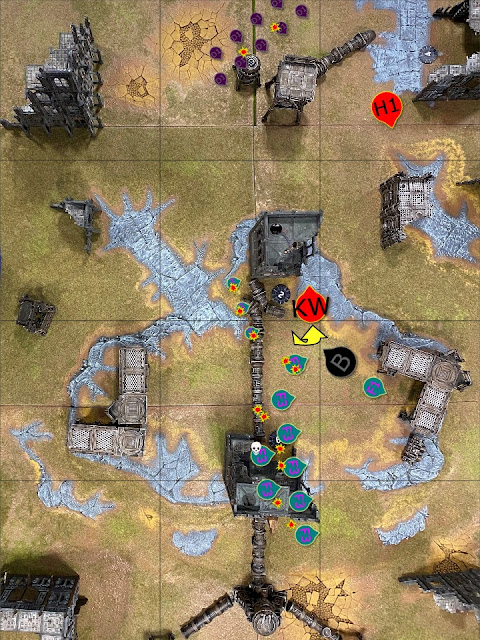

Machine Spirit Resurgent is the obvious choice for a strat. I may have but two wounds on the Warden, but he doesn't know it for this turn!
The Helverin turns on the Daemonettes, but their saves are improving, and only two fall. The Warden puts in some excellent work, killing a Fluxmaster, half the Flamers and the last few Horrors, but Belakor still somehow evades the fire. It's like shooting smoke!
So I reluctantly charge in.

Twelve attacks from the big feet, and it's just enough. But only just! I'm there, staggering about on those last two wounds, but Prince Smokey has been quenched.
Daemons Turn 4
 |
| More map errors - Be'lakor is dead now. That's a totally unrelated column of smoke lurking there. |
I repeat last turns trick and jump flamers to open objective and then a herald back into the spot they left; with the daemonettes claiming the third objective I would score enough vps to ensure a win; and with only two units there was going to be no way back for the knights. But revenging Belakor's death meant I wanted to bring the big knight down.
With two wound remaining, I manage to smite him, but only get one wound, and so it is the flamers that get the killing blow.

The daemonettes have a charge for fun, there can be no overwatch and they won't all die, but also have no chance of killing the knight. Still it seemed the thing to do.
Objectives scored: 6
Result: 13 - 8 to the Daemons!
Locker Room
That was a hoot! I really enjoyed the Knights list. For what could have been a game settled in a single turn, it turned into a good power struggle over four. But in the end, the combo of being wildly outnumbered and not taking down Be'lakor sank my hopes.
It was a fun game, and a good reminder about playing objectives. I did like the open war variation for this type of game; and would definitely try again. It is fair to say the twist was a little more disruptive for me, especially the extra attrition penalties - but they can be used to tell the story. The daemons were obviously leaving this world and the the pull of the warp was too great for some to deny.
Maybe I should have been focussing fire on him even more than I did? Stripping away those Daemon units felt like the right thing to do, to break the hold Kas had over the middle as early as I could.
I think that's right, as it was only the ability to claim more objectives as more units that worked. Most of my units did not stand a chance when you opened up on them.
But maybe if I'd taken Belly out, the remaining puny Daemons would have really struggled to do anything to the Knight Warden. I could have stomped my way through them and taken the centre for a while at the end. But no - I had to go and split my fire, thinking foolishly a single hit from a cannon would have flattened the shifty bugger!
If the luck had gone the other way, and you'd deleted Belakor rather than Keeper it may have been different as the fight again strat really helped me. That said, given one of the goals was to test Belakor: it would have been demoralising to have lost him before even starting my turn! Given how quickly you took twelve wounds off him, he held on to the last four longer than I expected.
Great fun. Knights feel in a good place to me from that game. They're utterly deadly until you run out of either CPs or bodies, and both seem to happen faster than they used to. Against Be'lakor, anyway!
I have a game on Saturday against some Orks, will be interesting to see how fair there. Also will be keen to see a Disciples list at some point too, but need to do some more thinking there first.
Yow! Be'lakor is a beautiful model and it is HUGE!
ReplyDeleteGreat game guys, a real test of the big models! I'm really looking forward to trying the Orks out against the Daemons this weekend and having to make the same horrible choice of go for the big boys or chew through the hordes
ReplyDeletePro tip: do both.
Delete