

In our last clash, General Pootle's Daemons fell foul of the Tyranid gunline. Something tells me he's out for revenge, and he won't stop until he's cracked the bug problem. This time, the Daemons are bringing Chaos Marines as backup.
Will they succeed? Or can I, General Kraken, preserve the winning streak of my insectile chums?
Power armour whets my appetite!
It's All-Skype Fight Night!
Tyranids - The Bugs are Back in Town
Hive Fleet Kraken Battalion
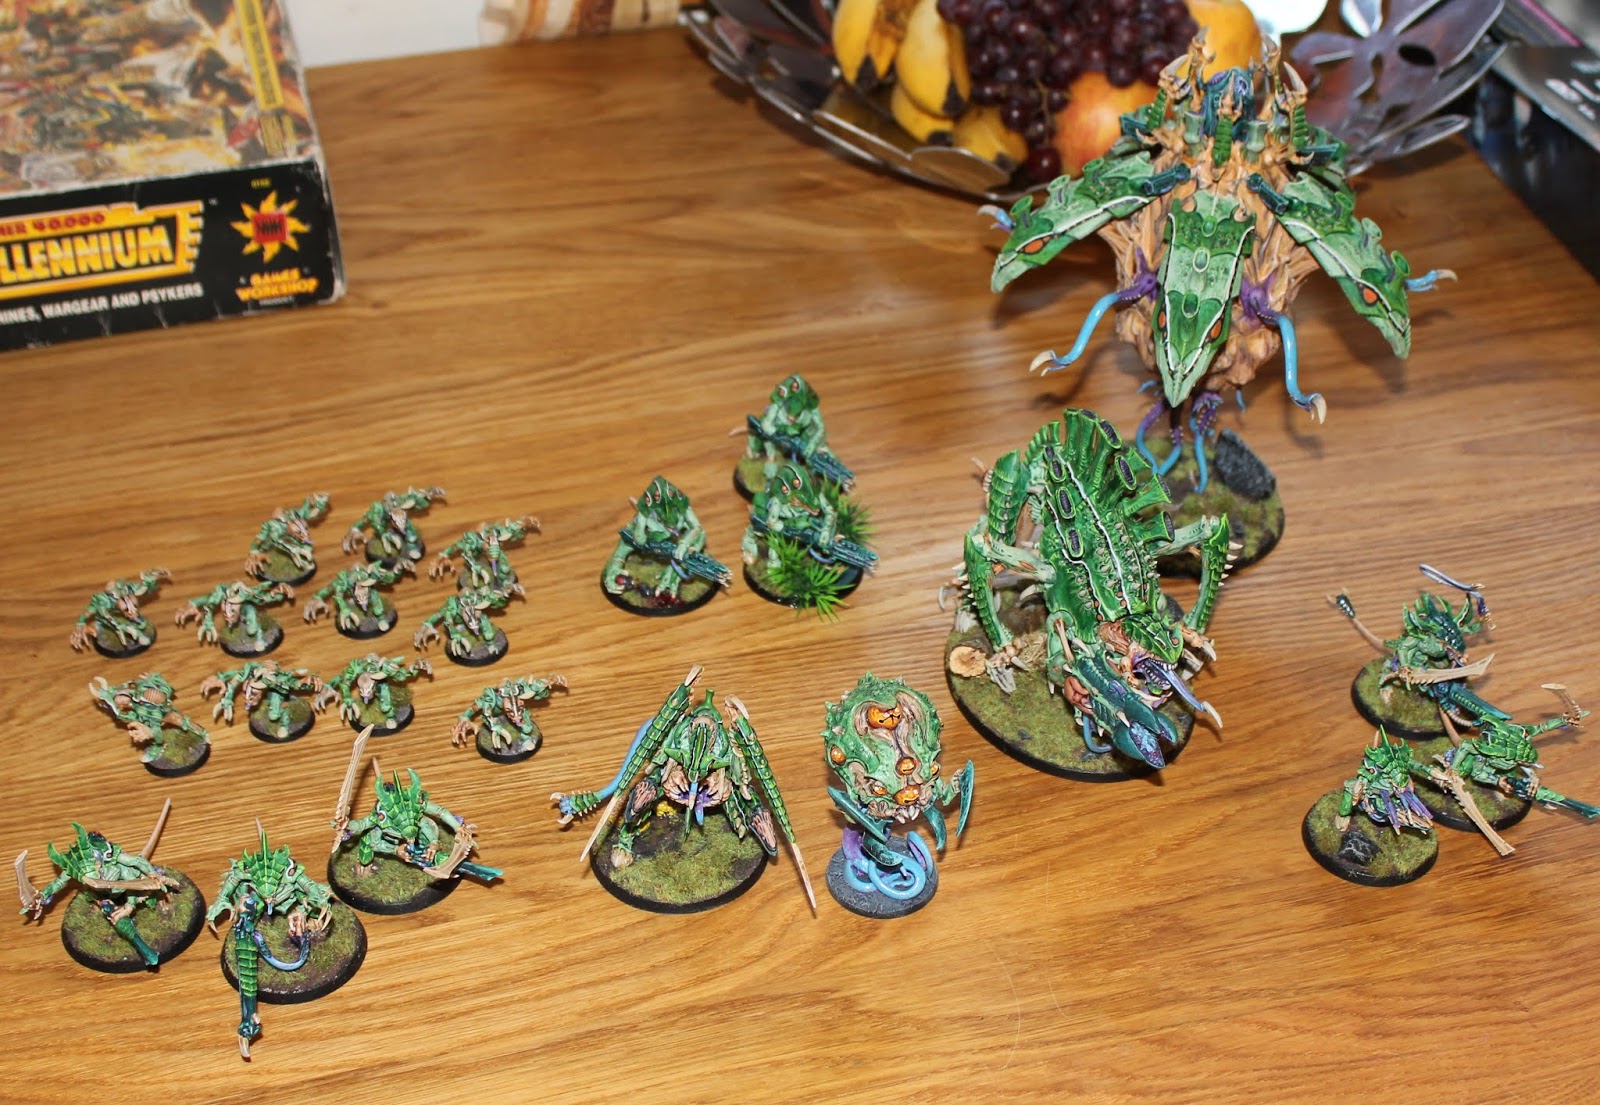
- HQ - Hive Tyrant with twin Devourers with Brainleech Worms and Monstrous Bone Swords, Catalyst and The Horror, Warlord with Adaptive Biology and Chameleonic Mutation relic
- HQ - Neurothrope with Onslaught and Smite
- Troops - 3 x Tyranid Warrior - 2 Deathspitters and Bone Swords, one Venom Cannon and Rending Claws
- Troops - 3 x Tyranid Warriors - Same Again
- Troops - 10 x Genestealers
- Elites - 3 x Hive Guard with Impaler Cannons
- Heavy Support - Tyrannofex with Acid Spray
- Dedicated Transport - Tyrannocyte with 5 x Deathspitter
A fairly small swarm, but with plenty of punch. Broadly, the plan is to have the Warriors grab objectives as the rest of the swarm launches forward to munch the enemy. Between a deep striker (and I still haven't decided whether to put the Genestealers or the Tyrannofex in it) and some heavy supporting firepower from the Hive Guard, I'm hoping to eradicate the Marine fire teams one by one.
What to do with the Daemons is another story. Genestealers ought to make mince out of the smaller ones, and the Hive Tyrant is in theory an even match against the Daemon Prince. But I've never seen mine do anything other than die against them in straight sets, so I'm a little anxious. Especially as it's more mobile than mine with those wings. And with the Mark of Khorne on them, even a small unit of Furies can put out a lot of high strength attacks...
Chaos - Blood Purgatives
 |
| The proxying could have been worse! Two squads of actual furies, a Daemon Prince, the old lead Obliterator and some renegade guard cultists, as well as a chaos space marine or two, before the well ran dry. The random lead monsters on the left there are Flesh Hounds, the Goliath Gangers are CSM and the Assorted Blackstone model squad are Havocs (the Beastmen have lascannons, because of course they would). |
Last time I fought
Kraken’s ‘Nids, my
Nurgle daemons (who brought only two guns, one of which was a 6” sneeze) were
blown away in short order. I therefore wanted to try a different tack by
including some shooty chaos marine support.
CSM Battalion (The Purge)
- HQ - Chaos Lord with Chainaxe, combi-plasma, Mark of Nurgle
- HQ - Sorcerer with Combi-bolter, Force Stave, Mark of Nurgle, Infernal Gaze and Prescience
- Troops - 10 x Cultists with autoguns and a heavy stubber, Mark of Nurgle
- Troops - 5 x Chaos Space Marines, Lascannon, Champion with chainsword and bolter, Mark of Nurgle
- Troops - 5 x Chaos Space Marines, Reaper Chaincannon, Champion with chainsword and combi-bolter, Mark of Nurgle
- Heavy Support - 5 x Havocs, Autocannon, 2 x Lascannons, Reaper Chaincannon, Champion with chainsword and bolter, Mark of Nurgle
- Heavy Support - 1 x Obliterator, Mark of Nurgle
- HQ - Daemon Prince of Khorne, Armour of Scorn, Hellforged Sword, Oblivious to Pain, Warlord, Wings, Mark of Khorne
- Fast Attack - 4 x Flesh Hounds, Mark of Khorne
- Fast Attack - 5 x Furies, Mark of Khorne
- Fast Attack - 5 x Furies, Mark of Khorne
I wanted to stick with
Nurgle, but my own beloved Death Guard aren’t particularly handy at either long
range support or moving quickly so I decided to try a different legion, but
stick with the Nurgle mark throughout (eschewing the foul temptations of
Slaanesh to shoot my Havocs or Obliterator twice…).
Initially the Daemonic
detachment was Nurgle as well, but having been let down somewhat by Disgusting
Resilience last time and worried about the choppiness of the Tyranids, I
decided to try out a Khorne detachment instead – if I can get some charges in
with these fast-moving units, that might start hurting stuff. That also let me
try out Flesh hounds, which would also be handy in trying to contain the Tyranids' psychic shenanigans.
I decided that the
Prince should be the warlord, partly as he wouldn’t have it any other way,
partly because I don’t have access to the specific stratagems for The Purge,
but mainly because by taking Armour of Scorn (4+ invulnerable save plus deny
the witch) and being Oblivious to Pain (6+ FNP) I’d be able to hang around that
little bit longer (statistically that’s fractionally better than being a Nurgle
daemon with a 5+ followed by 5+ Disgustingly Resilient…but who believes in
stats?)
From a fluff
perspective I can get my head around the idea that The Purge (who apparently
have the simple goal of wanting to kill all life) and Khorne (who isn’t exactly
averse to a spot of bloodshed) might see eye-to-eye when it comes to killing as
many Tyranids as quickly as possible. After all, these nasty bugs aren’t
really killing things at all, just…recycling them. And we can’t be having that!
My plan is to sit the
Havocs back as far as possible, screened by cultists and the other two marine
units. The Obliterator will probably go into deep strike. Meanwhile my Khorne
daemons will run forwards (the Furies screening the Prince as far as possible)
and kill whatever they come across. I’d like to get my DP’s teeth into the Hive
Tyrant if possible, but I’m not expecting that to be easy.
Mission and Terrain

Elsewhere, the jungle crowds in on the ruins of yet more scientific compound. Someone, somewhere, is fighting 40K on the pristine streets of a luxury Imperial settlement, all cool fountains and polished chrome. Just not here.
Deployment

Pootle won the roll-off, and picked Hammer and Anvil. Oh, Hammer and Anvil, how I loathe and despise you! I always feel this is the go-to pick if you're up against 'Nids, and therefore the one I see all the time
I'm sorry, but only a little!

Knowing I'm most likely to go first, I therefore stick everything in deepest cover, except a lone Warrior squad in the building on objective 2, just in case it turns up early. The Tyrannocyte engulfs the Tyrannofex and launches into orbit.

I could see that Kraken looked to be heading down their left flank (although I expected the Stealers to come scuttling through the central building). I placed the havocs first, putting them on the top of the building near (but not on) objective 1 as far away from the Stealers as possible. The Lord was down below them on objective 1. I deployed the marines with the chain-cannon at the top of the map to move forwards onto objective 6 and then either be able to lay down fire on anyone coming out of the northern exit to the building or shoot at the Warriors on objective 3.

The other marine squad with the lascannon were on top of the building in the south west corner, with the lascannon on the bottom corner so he the best field of fire possible. The Prince (with a screen of one of the units of Furies and the Hounds) got ready to jump round the corner of the building if anyone got close enough for a charge. The Cultists, Sorcerer and the other Furies stayed behind the building in reserve.

Reading all that, I can see that Pootle had a plan. I didn't really - get the Hive Guard into range and shoot, then steathily make my way into eating range before tucking in, was as complex as I got.
Overall, then, we looked like this:

And I chose to go first, despite knowing I could let Pootle waste his first turn shooting at almost nothing. Still - no point sacrificing the Warriors at the top to Havoc firepower, so better to get on with some quality skulking!
I attempted to steal the initiative, despite warning my 8-year-old son who was watching that stealing was naughty. Mind you, Chaos is nothing if not at least a little "naughty". I failed, but I wasn't too worried given the lack of targets.
Tyranids Turn 1

Sure enough, off I went, deep into cover. The main force headed into the building, the Hive Guard taking point behind some crates as the Warriors ducked behind the nearest walls.

My first draw wasn't too bad. Assassinate, Behind Enemy Lines and Decapitate (Tyranid special for killing characters) were all playing to my strengths - run forward and chew on things. Even if, for now, it was mostly the scenery.

The only action was the Hive Guard dropping a single Fury from the nearest squad - I knew that leaving a shooty squad that far forward was asking for company, but I was also hoping to bait Pootle into a rush down that flank. Expensive bait works best, even if it's a gamble!
Finally, I ditched Assassinate. Better to opt for some variety, I think, rather than doubling down. A nice safe 'Defend 5' would be nice, for example.
Chaos Turn 1

I drew Hold the Line, The Great Game and Master the Warp as my objectives. I couldn't score Hold the Line in the first turn but thought that the other two looked good - the Great Game meant that I rolled a die at the end of each turn and scored that number of VPs if I controlled that number of objectives. Nicely random - could be very, very good, but only if I controlled most of the battle field.

I advanced the chain-cannon marine squad almost onto objective 6 (the Tyranids nearby weren't visible so there was no point just moving). The Cultists dropped back to form a screen in front of the Lord a reasonable distance from the Stealers (though I knew that they could be reached if Kraken wanted to!)


I advanced the chain-cannon marine squad almost onto objective 6 (the Tyranids nearby weren't visible so there was no point just moving). The Cultists dropped back to form a screen in front of the Lord a reasonable distance from the Stealers (though I knew that they could be reached if Kraken wanted to!)

Without really thinking, I advanced the unit of Furies 18" onto objective 3. The Hounds were only able to advance 12" forwards and then I realised that I'd pushed the Furies a little too far forwards as I didn't want to put the Prince quite that far forward as he'd be able to be charged by a large number of nasty bugs. So having urged his winged comrades onwards, the Prince decided to hold the leads of the Hounds and leave the Furies to their fate.

I tried to cast Prescience on someone (it didn't matter who as there was nobody to shoot at), but fluffed the roll. I briefly considered spending a CP in order to get a VP, but decided that it would be a waste as I didn't need Prescience. Because of the lack of targets and general advancing on my side, there was no shooting and that was the end of my turn.
I discarded Hold the Line as I knew that Kraken could drop a Tyrannocyte into my back field next turn and the Stealers could also move a long way rather quickly.
Tyranids Turn 2

Excellent - he'd taken the bait. Everything dropped backwards out of the building, although I was careful to leave the Tyrant outside even the most distant charge range from the Daemon Prince - he'd have to work for it if he wanted to get the drop on me!
The Warriors began a cautious advance towards the Chaos Marines near 6, the other Warriors hopped onto the crates to shoot and the Genestealers zipped forward, claws flexing, boosted by Opportunistic Advance to get right next to the Furies in no time.
No Catalyst, although I did slap The Horror on the Hounds just in case. Then the Neurothrope smote three of the Furies away, leaving me to concentrate firepower on the Khorne Dogs. Sure enough, they went the way of all Flesh Hounds, although it took Single-minded Annihilation from the Hive Guard to do it.

All that was left was for both Warrior squads to achieve nothing through shooting (nothing to see for the lower lot, no armour they could get through for the top lot), then the Genestealers ate the last Fury and then ran away. Hooray for Overrun! They got a good advance roll, and zipped right back inside the main bunker (marked as movement on the next map).

I'd drawn Supremacy as my new objective, and kept it for now - valuable and easy enough to grab if I played for it. I was hoping, in fact, for the North Warriors to manage a long charge into the Marines on 6, which would have made 3, 5 and 6 a nice score. It was out of range through the woods in the event, though, so I'd have to wait and see.
Chaos Turn 2

I drew Delight in Dispair (cause a failed morale test), which was practically impossible to achieve as the bugs weren't going to even be taking them anytime soon.
I duly delighted in your despair.
I did have a few things to shoot at this turn and wanted to maximise my chances of hitting things. I moved the chain-cannon marine squad onto objective 6, ready to shoot at the Warriors in front of them. I advanced the Sorcerer towards that squad so that he could be within 18" and cast Prescience. I needed a CP reroll to get close enough, and tucked him in next to the building.

 |
| "Yes, you're all clearly furious. But how fast are you?" |
I managed to cast Prescience on the marines (scoring a VP) and unloaded with the chain-cannon and four bolters onto the Warriors (one bolter was out of range, but the champion had a combi-bolter). The chain-cannon (8 shots at S5, -1 AP) managed to kill one Warrior and the bolters took a wound off a second.

On the other side of the field, the lascannon snapped off a shot at the Warriors on objective 5, killing one of them.
Objectives scored: Master the Warp (1): 1-0 to Chaos
I discarded Delight in Despair at the end of the turn as that wasn't going to happen. We suspected that it must be relatively unusual to get the end of turn 2 and only have 1VP scored. A very cagey opening period...now time to spill some blood!
I discarded Delight in Despair at the end of the turn as that wasn't going to happen. We suspected that it must be relatively unusual to get the end of turn 2 and only have 1VP scored. A very cagey opening period...now time to spill some blood!
Tyranids Turn 3

Oh, hello exposed character.
Aaargh! My poor Sorcerer - what a muppet leaving him so close to the Stealers!
Well, 'so close' in this case was a good 20", so you shouldn't feel too bad. All the same, you should always travel in pairs through 'Nid country.

As the Tyrant and Neurothrope took exactly this advice, moving upfield together, the Tyrannofex dropped in a little further upfield. I kept it close to the wall of the bunker than the map shows, so there was very little chance that the Havocs would see it without a good long jog first. Although sitting that close to the corner was probably not ideal.


The North Warriors managed to drop a couple of the Purge Marines opposite them, the Hive Guard shredded three of the Furies and between them, the Fex and the Cyte cleared the middle out of the Lascannon Marine squad. Pootle carefully left the Lascannon on the corner and another guy on the back at objective 4 - they wouldn't be moving anywhere with coherency broken, but they didn't really need to.
As the North Warriors failed their charge across the gap to grab objective 6, I could see Supremacy slipping away. And then the Genestealers somehow failed to eat the Sorcerer! Pootle was on point with his armour saves, and he scraped through with a wound left, after using a CP. I ditched Supremacy and passed the buck.
Objectives scored: None, 1-0 to ChaosAs the North Warriors failed their charge across the gap to grab objective 6, I could see Supremacy slipping away. And then the Genestealers somehow failed to eat the Sorcerer! Pootle was on point with his armour saves, and he scraped through with a wound left, after using a CP. I ditched Supremacy and passed the buck.
Chaos Turn 3

I drew Defend objective 4 and Scour the Skies as my new objectives. I had the remnants of a marine squad sitting on objective 4, but I knew that Kraken could probably knock them off it if he wanted to. However the Tyrannocyte that had just dropped in in front of all my heavy weapons could fly...
This looked like it could be the crucial turn. I had several things within reach of charges and my shooting, so I had to make it count. I moved the cultists so that they could help shoot the Tyrannid Warriors and then charge into the Stealers to (maybe) save the Sorcerer. More usefully, the Lord and two remaining Furies also moved to assist.

I started off with the cultists and then the chain-cannon squad on objective 6 trying to shoot the remaining Tyrannid Warriors. Unfortunately as they were now in cover I managed to only take a single wound off them. An ominous start...

This left the Obliterator free to target the Tyrannofex and put 6 wounds onto it, which was a good start.
 |
| Ow. |
In the charge phase the Cultists, Lord and Furies piled into the Stealers and the Daemon Prince made his 8" charge (using the Khorne reroll from a 3 initially), taking a wound on overwatch.
Without really thinking, I decided to start with the Lord on the Genestealers. He duly carved up four of them, but then Kraken paid 2CP to interrupt. I suddenly realised that my Prince could have his initiative stolen, but we discussed and both thought that it was pretty unlikely either of the big boys would be killed in a single round of combat, so Kraken's Stealers decided to take a last pop at the Sorcerer before they were taken down...and duly removed his last wound (rather easily).
Then they ate his brain! After using all those CPs they needed to try and regain a few. Luckily, I rolled well for the Feeder Tendrils strat, getting three back so I was back to where I started at the start of the round.
The Furies killed another couple, and the last two went down to the Cultists, wielding nothing but rusty knives and harsh language.


Objectives scored: Scour the Skies (1); Decapitate (Tyranids:1). 2-1 to Chaos
I discarded Defend Obective 4 after a bit of a wrestle. It annoyed me to discard an objective that I had already started to defend, but I thought that if I kept it then Kraken would definitely target the marines to stop me getting the VP, so it was almost inconceivable that I'd be able to do so. Therefore I discarded it to try to get a friendlier draw.
I discarded Defend Obective 4 after a bit of a wrestle. It annoyed me to discard an objective that I had already started to defend, but I thought that if I kept it then Kraken would definitely target the marines to stop me getting the VP, so it was almost inconceivable that I'd be able to do so. Therefore I discarded it to try to get a friendlier draw.
Tyranids Turn 4

Surprised and delighted to still be alive, the Tyrant politely doffed his hat and stepped back from the Prince. Time to introduce Khorne to the joys of being psychic.

The new objective was to grab number 2, so the North Warriors ran back in a circle to where they'd started and did that.
You also had Defend objective 4, which was deep in my lines and would have put you within easy sight of my Havocs.
Everything else camped round the Daemon Prince and chuckled, although I also moved the Neurothrope so it had a choice of DP or Obliterator, just in case I got lucky.
Which I nearly did! A mega-smite and a normal one took a good chunk out of the Khorne Prince. It also triggered his Oblivious to Pain ability, so he was clearly super-furious about all this. It wouldn't help him if he was dead, luckily, and he quite soon was thanks to a round of gunge from the Fex.
I thought I'd at least force the 'Fex to shoot at the Prince twice, but I managed to fail all the invulnerable 4+ saves and needed something like a dozen 6++ to keep him alive.
With spare gunge to hand, I also hosed off the Lascannon marine's pal.
I was briefly tempted to keep the champion on Objective 4 alive, but I really wanted the lascannon to shoot at the remaining big bugs.
Then the Hive Guard and Tyrant together totally failed to hurt the Obliterator.
I spent another CP to reroll a save on him.
The southern Warriors couldn't see him, and the Northern ones had exhausted their aim by running about, so that was that. Nobody quite felt up to charging anything, so I'd scored a couple of handy points and taken the lead.
 |
| Not pictured: Daemon Prince |
Chaos Turn 4

After discarding Defend Objective 4 last turn (and still having a marine vaguely near it), I then drew Touched by the Warp (cast or deny a power) - unfortunately now impossible - and Defend Objective 3 (where the Hive Tyrant was trampling on the corpse of my Daemon Prince).
I had to tie up the Tyrannofex in combat, preferably without being bathed in acid on the way, so moved the Furies and Chaos Lord to the corner of the building, just out of sight of the 'Fex (it was tucked in a bit more than shown in the map in order to be out of sight of the Havocs).


Yes, I was just tidying it up - Battle Chronicler doesn't let you break squad coherency!
To start the shooting the Chain-cannon squad opened up on the Warriors on top of Objective 2, this time managing to kill both of them. The Lascannon marine then took the remaining wound off the Hive Tyrant, and the Obliterator killed then entire squad of Hive Guard (I used a CP to reroll the damage output and ended up with D3 once again, meaning all failed saves killed a model).
Both the Lord and the Furies made their charges on the Tyrannofex (and even caused a couple of wounds), but the main result here was that it wouldn't be shooting next turn.
Objectives scored: Slay the Warlord (1). 3VPs to each side
I discarded the unachievable Touched by the Warp.
I discarded the unachievable Touched by the Warp.
Tyranids Turn 5

I was looking a bit thin on the ground now! But the new objective draw gave me hope. Area Denial was easy enough, but only the Furies were stopping me from getting the full value of that draw. And Swarm was another shoe-in - the Purge had been running about and neglecting their objectives a bit, so by pulling the Fex and the Thrope back on to 3, I had more than them and some points to boot.
And then the Thrope went full-on psychic berserker, Smiting off the Obliterator and Shrieking off the Furies.
Now there's where a Disgustingly Resilient save would have been VERY useful. I'd hoped that an Obliterator in the jungle with a 1+ save might be more awkward to dispose of than that.
He'd lost three wounds to the Obliterator in the last turn, so it was extra-satisfying to suck one back off him. Lots of points to me, and a helpful lead!
Time to discard Behind Enemy Lines, though. Reality had finally caught up with my optimism.

Chaos Turn 5

My new objective was Secure Objective 3. High command really thought there was something interesting there.
Yes! The remnants of your Warlord. Get enough of the skull fragments and they would make a nice cup. It's the least they could do to commemorate him.
I hadn't thought of that. In WFRP there were a number of spells that could be cast using the various body parts of a daemon (though I think a dragon was the single best walking spell component). Maybe Nurgle was trying to replace the magical abilities of their dead sorcerer.
Ahem.

The lonely Chaos Lord briefly considered how well his invulnerable save would stand up to a large dose of acid, and decided, like the Daemon Prince did earlier in the game to find some colleagues to inspect, this time the cultists. They lined up at the corner hoping to be able to charge the Tyrannofex from out of LoS again next turn. The Havocs ran up onto Objective 4. Meanwhile the marines on objective 6 were so far from anything useful they decided to stay there in case that objective came up. In retrospect I should have run them forwards to get linebreaker, but there you go. We agreed that their hatred of all living things extended to the plant life all around them, so I pictured something a little like that scene from Predator with Arnie blazing away at the vegetation. If only I'd had a chopper somewhere nearby I could have got to.
 |
| "Where's the bloody chopper?" "I think it's next to the Prince's corpse where he left it" |
The only thing I had to shoot was the solitary lascannon marine. He took a potshot at the Tyrannofex and not only hit and wounded, but rolled a six for damage (I didn't even need a CP reroll) and killed it! Even better than that, the big bug went nutty and its death throes managed to kill the Neurothrope who was floating right next to it due to some terrible/excellent dice rolling from Kraken. Suddenly the massive scary bug and the psychic invulnerable bug weren't there any more and there were only two Tyrannid warriors left on the field.
I (very gently) cursed myself for running the Lord away, although it would have been somewhat overconfident if he'd run forwards in the movement phase to charge the Neurothrope and try to get within 3" of Objective 3.
Objectives scored: None. 6-3 to the Tyranids.
I thought about discarding Defend 3, but it was the only realistic way of getting 2VP and drawing level with the 'Nids: I might have ended up with something even more impossible. But if the game ended now, I'm beaten.
This could be it! I could have squeaked a win! But no, the dice were rolled and the game rolled on.
Tyranids Turn 6

Curses - having another turn to fight probably meant I'd need some good scores quickly, and there wasn't much to do it with. Blood and Guts, Overwhelming Firepower and Secure Objective 3, all excellent draws but not really plausible.
The Warriors slunk back into their packing crate and hoped to get posted to a nice civilian world next time.
 |
| "I hear Abu Dhabi VI is supposed to be nice. It's an Imperial Kitten World." |
Chaos Turn 6
I had lots more boots on the ground, but a sizeable VP deficit and I couldn't see any Tyrannids to shoot at. That's a high-quality problem really, but meant I simply had to roll a high advance to get troops to secure objective 3 and then hope the game went on one more turn so that I could defend that objective. That would only give me a draw, but definitely worth playing for.

The Lord bellowed at the Cultists that he was sure there were now no gribblies round the corner, where he'd just come from. Surprisingly the Cultists believed him and ran to just within 3" of objective 3 to secure the Prince's skull. However I still needed another turn in order to defend it. Unless I could luck out with the Great Game objective that I'd been quietly rolling (and failing) all game.
And then the final nail in the coffin - holding three objectives, Pootle rolled 3 for the Great Game. There'd also be no more turns. He'd swung it at the last minute!

Objectives scored: Secure Objective 3 (1), The Great Game (3)
Result: Victory to Chaos 7:6!
Locker Room
That was a belter! The Great Game won it, and you can't get more apposite than that.
I did feel slightly guilty about that, but I had loads more troops on the ground, and rolling the Great Game for six turns, it's not exactly surprising that it did come up eventually. However to have it happen on the penultimate roll of the game was particularly entertaining! And, like all good games, it did feel like the game swung forth and back rather than one side dominating. Great fun!
Sometimes, as I slap down huge LOS blockers in the middle of the field, I feel a bit guilty. It's playing to my home team advantage, and it does favour assaulty armies. But look at the match we got out of it!
I completely agree. I'd not change the set-up if I'd have done it and I'd been even more shooty. The opening couple of turns where we jostled for position was very tense.
A strategic fencing match back and forth across the lower field, crafty use of CPs to steal advantage and a very tense final. Doesn't really compare to shooting Tyrannofish in a barrel. With Lascannons.
Speaking of which, what was the final kill tally for Mr Lascannon?
Yes, although my Havocs were massively out of place (more on that later), the lascannon-armed marine near objective 4 more than made up for that. He killed a Tyrannid Warrior, finished off the Tyrannocyte, finished off the Tyrannofex (which then killed the Neurothrope) and then finished off the Tyrant. Others did the ground work (and he consistently benefited from shooting at things others had wounded so had a free Purge reroll), but he was very definitely my MVP - I don't think he missed a shot all game.
My MVP was probably the ever-reliable Neurothrope with his psychic powers, but it was a low performance from mine across the board. The Hive Guard were a good nuisance, but really didn't achieve as much as their points suggest they could, the Tyrant whiffed his one round of combat and the Genestealers couldn't even eat a lone sorcerer in one round!
Ten 'stealers felt minimal to me, but actually, I think I'll go even lower next time. A squad of five would have flattened most of their opposite numbers in this match, given me more board control and been easier to hide in dark corners. The fencing dashes you can pull with Overrun make them pretty viable, I think - two small groups would also have meant I could consolidate the Warriors into a single, more effective squad, although they also work well for board control in small teams.
Despite deploying second, I managed to put my Havocs in a corner where they ended up not really shooting very much (their only shots of consequence were two lascannon shots on the T'Fex). I had wanted to keep them out of harms way (=genestealer charge distance) and use them to tempt the Hive Guard forwards so my daemons could chomp them. That didn't work, as the battle ended up happening south of the main building, but if I had put them on the south-west building they'd probably have been targeted more.
Overall I like the mix of shooty Purge marines and choppy Khorne daemons. I was periodically distressed to not be Disgustingly Resilient, but I've found some potential allied detachments for a central core of Death Guard I think.
Well, so much for my winning streak! But I'll be back...
I certainly hope so!
That was right to the wire! Good batrep, gents.
ReplyDeleteDesperately unlucky at the end, Kraken (so at least you're consistent!)
The law of averages dictates that a game will come where I will be physically unable to roll lower than five.
DeleteYou rolled plenty of 5s and 6s: for example the 6 to make the Tyrannofex go nuts, and another to inflict maximum mortal wounds on the Neurothrope...
DeleteNot to rub it in, but he really was unlucky: I thought I needed to roll a 6 to get a 12" advance on the Cultists to secure objective 3 at the end. I rolled a 5 and Kraken, after much remeasuring, reckoned that the lead cultist was within 3" by the skin of his teeth - personally I suspect I received a strong benefit of the doubt there.
DeleteThat comes with the territory of a SkypeBoot - it behoves the hosting player to give some leniency with distances, to balance out the guest player not actually being present at the table.
DeleteThat cultist was half an inch over the 3" bubble, and there was nothing I could do about it. It's my own fault for fielding properly painted and representative miniatures instead of the hideous proxies they deserved.
DeleteGreat bat rep. I will point out though that you are supposed to randomise the type of deployment you use. I only just learned this myself.
ReplyDeleteWe have a house rule to use the CA18 deployment rules for all missions (even the ones from the older books) so we roll off and the winner picks the deployment map and which zone they will deploy in. The loser then deploys their army in the other one and gets to choose whether to go first or second (subject to stealing the initiative).
Delete