

So! You have heard the tales of Stylus's Woffboot Campaign so far. Now sit awhile and listen as I, Kraken, unfold the saga of my war!
9th Hagan Lampreys
Last year, I took the Hagan Lampreys to their first 'Boot. And I got trampled 4-0! This year, armed with a bit of practice (and watching Stylus use them properly), I was bringing them back to see if they could wipe the stain of failure from the record.
It's a list built to the strengths of my collection. Fast transports and lots of small shooty units, backed with a CP-regenerating command and a little close combat power, courtesy of a pair of Inquisitors. There has also been a few new rules out since last year, and I'm taking advantage of that too but it all costs CP, hence the HQ battery.
First up - a requisitioned Assassin (Vindicare) using the all new rules from White Dwarf. Just before the new FAQ knocked up the cost to 2CPs instead of one, luckily for me and unluckily for the others, so this was the full filth.
Secondly, another CP spent on taking the Tempestus Drop Troops detachment from Vigilus Defiant. This doesn't do much by itself other than give my infantry and Valkyrie a new keyword. But the keyword gives me access to two rather handy strategems, which fit in with the playstyle of the army and may hopefully give me an edge in the tournament!
++ Battalion Detachment +5CP
+ HQ +
- Colonel 'Bunny' Badger - Tempestor Prime: Display Astra Militarum Orders, Power maul, Relic: Kurov's Aquila, Tempestus Command Rod, Tempestus Drop Force
- Commissar Colderine - Lord Commissar: Grand Strategist, Plasma pistol, Power fist, Power sword, Warlord
- Militarum Tempestus Scions: Tempestus Drop Force 4x Scion
- . Scion w/ Special Weapon: Hot-shot Volley Gun
- . Scion w/ Special Weapon: Hot-shot Volley Gun
- . Scion w/ Special Weapon: Hot-shot Volley Gun
- . Scion w/ Special Weapon: Hot-shot Volley Gun
- . Scion w/ Vox-caster: Vox-caster
- . Tempestor: Bolt pistol, Chainsword
- Militarum Tempestus Scions: Tempestus Drop Force
- . 2x Scion
- . Scion w/ Special Weapon: Plasma gun
- . Scion w/ Special Weapon: Grenade Launcher
- . Tempestor: Chainsword, Hot-shot Laspistol
- Militarum Tempestus Scions: Tempestus Drop Force
- . 2x Scion
- . Scion w/ Special Weapon: Meltagun
- . Scion w/ Special Weapon: Flamer
- . Tempestor: Chainsword, Hot-shot Laspistol
- Militarum Tempestus Scions: Tempestus Drop Force
- . Scion
- . Scion w/ Special Weapon: Plasma gun
- . Scion w/ Special Weapon: Plasma gun
- . Scion w/ Vox-caster: Vox-caster
- . Tempestor: Chainsword, Hot-shot Laspistol
- Militarum Tempestus Scions: Tempestus Drop Force
- . Scion
- . Scion w/ Special Weapon: Meltagun
- . Scion w/ Special Weapon: Meltagun
- . Scion w/ Vox-caster: Vox-caster
- . Tempestor: Chainsword, Hot-shot Laspistol
- Militarum Tempestus Command Squad]: Tempestus Drop Force
- . Tempestus Scion: Hot-Shot Lasgun
- . Tempestus Scion w/ Medi-pack: Medi-pack
- . Tempestus Scion w/ Platoon Standard: Platoon Standard
- . Tempestus Scion w/ Vox-caster: Vox-caster
- Officer of the Fleet
- Ogryn Bodyguard - Bullgryn Maul, Bullgryn Plate, Slabshield
- Tech-Priest Enginseer
- Tempestus Drop Force, Imperial Ingrid - Valkyrie: Hellstrike Missiles, Lascannon, 2x Heavy Bolters: 2x Heavy bolter
- Brunhilde - Taurox Prime: Taurox Battle Cannon, Two Autocannons
- Sigurny - Taurox Prime: Storm Bolter, Taurox Gatling Cannon, Two Hot-shot Volley Guns
+ HQ +
- Inquisitor Hurous de Vaulot - Inquisitor with Force sword, Inferno pistol, Ordo Xenos. Psyker: Terrify
- Inquisitor Volx Mardi - Ordo Malleus Inquisitor in Terminator Armour, Nemesis Daemon Hammer, Storm bolter. Psyker: Dominate
- 1 x Daemonhost
- de Vaulots's Acolytes - 3 Ordo Malleus with Chainsword, Laspistol/Chainsword, Plasma pistol/Bolt pistol, Plasma gun
- Mardi's Acolytes - 3 Ordo Xenos with Laspistol, Storm bolter
General Pootle was to be my first opponent, and the first mission was Cleanse and Capture, just as Stylus and Kas were playing in the next room.
Death Guard (The Second Law)

You've already seen Pootle's Death Guard in action against Stylus's Wolves. Here they are again, just in case you missed it!
Battalion detachment
- HQ- Daemon
Prince of Nurgle (double Malefic Talons, Wings, the Suppurating Plate;
Putrescent vitality)
- HQ- Malignant
plaguecaster (the Pandemic Staff; Miasma of Pestilence, Blades of Putrifaction)
- Troops - 11 Cultists (Autoguns, 1 with heavy stubber)
- Troops -10
Cultists (Autoguns, 1 with heavy stubber)
- Troops - 7
Plague Marines (Champion – boltgun; 2 marines with Flails of Corruption; 1
marine with Blight Launcher; 3 marines with boltguns)
- Troops - 6
Plague Marines (Champion – boltgun; 2 marines with Blight Launcher; 3 marines
with boltguns)
- Troops - 6
Plague Marines (Champion – Plasma gun; 2 marines with Plasma guns; 3 marines
with boltguns)
- Fast Attack - Chaos spawn
- Fast Attack - Chaos
spawn
- Fast Attack - Foetid
Bloat-drone (Plaguespitters)
- Heavy support - Plagueburst crawler (Plaguespitters)
- HQ - Chaos lord in power armour (Combi-plasma, Power fist)
- Elites - Biologus Putrifier (Warlord: Arch-contaminator)
- Elites - Foul
Blightspawn
- Elites - Helbrute
(Power scourge, Twin lascannon)
Cleanse and Capture - Mission and Deployment
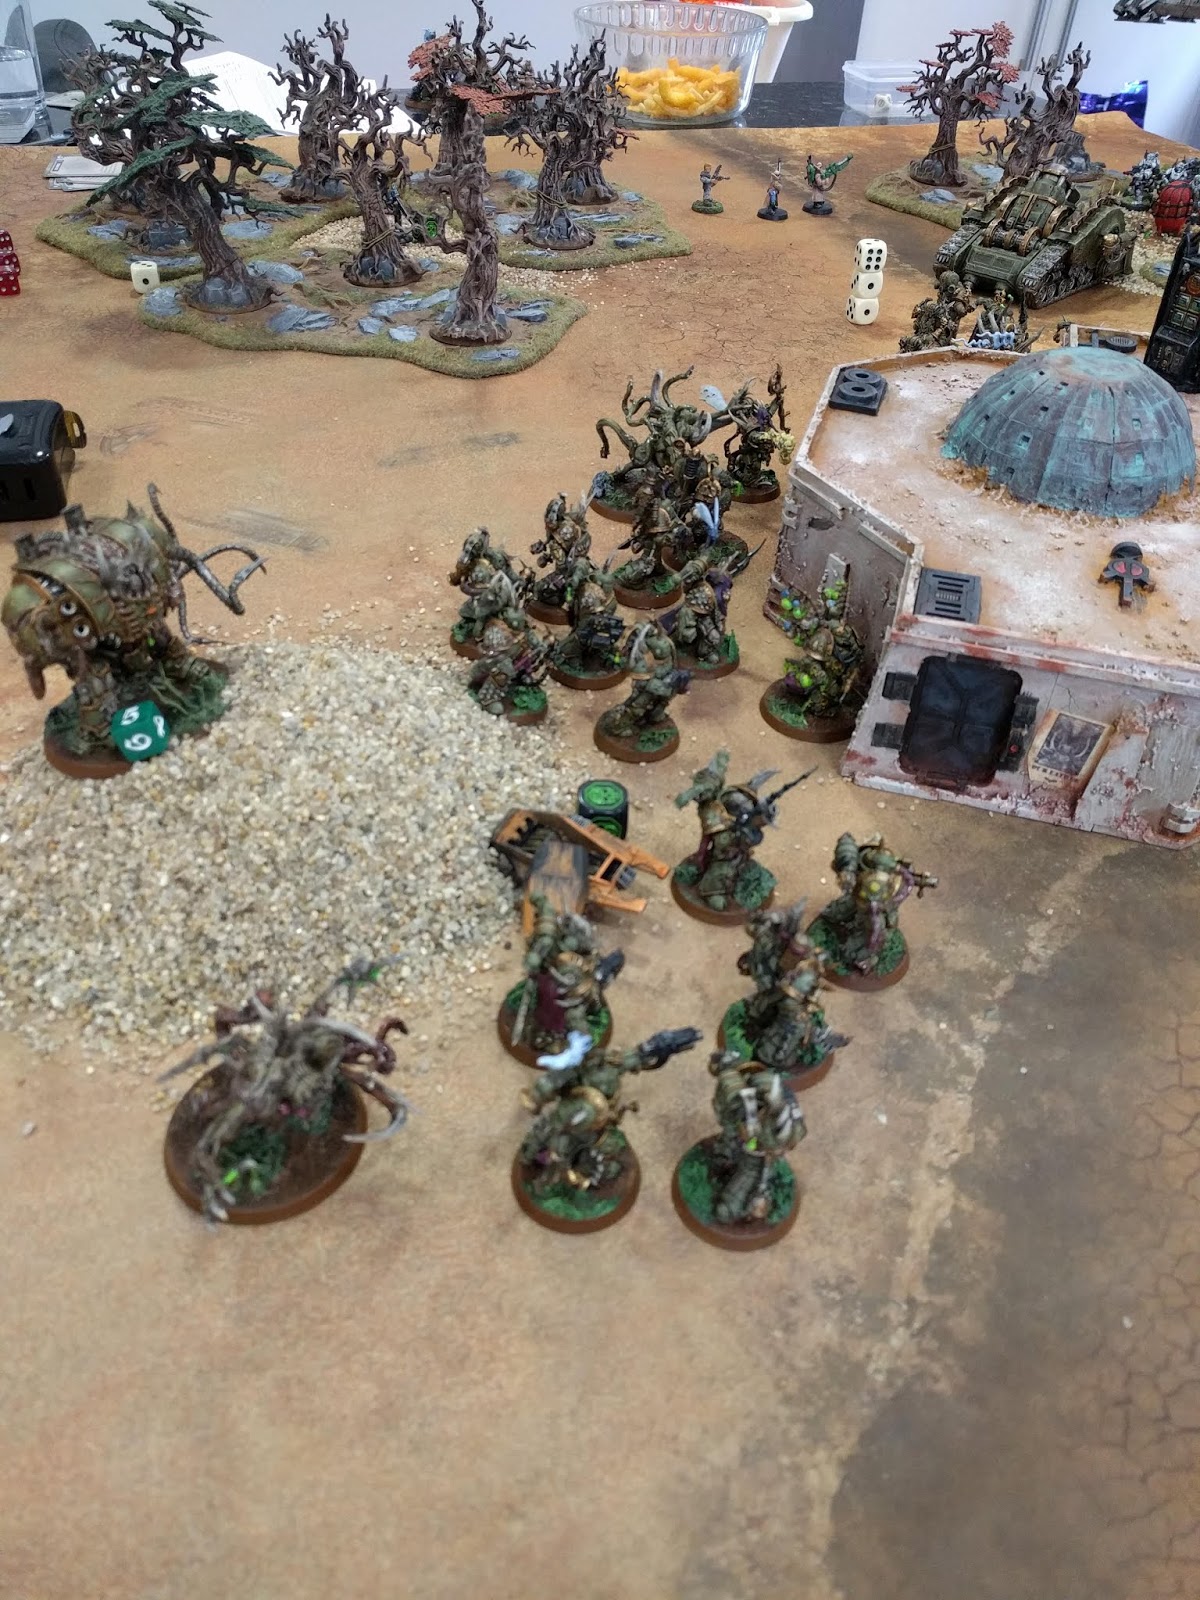
This is the most basic Maelstrom mission you can play. 6 Objectives on the table, you draw up to a hand of three at the start of each your turns, First Strike, Slay the Warlord and Linebreaker all in play, most VPs at the end wins. I got to pick the sides, so I took the diagonal deployment, allowing me to sieze the tall tower in the bottom right.
 |
| This was the kitchen table, resplendent under Stylus's battlemat and desert terrain. You can't see them on the map, but the objectives were one each in the northern woods, one on the rubble pile, one on the cantina roof, one just above the big tower and one out in the open near the small comms building (I think - it was a week and a lot of dice ago!) |
I had to
deploy first, putting one squad of cultists on each wing, the plasma squad and
lord planned to advance to the left of the building in the centre of the table along
with the PBC with the rest advancing to the right, led by the DP and FBD. I had
my helbrute on a small hillock to get the best view possible of the Valkyrie
and try to shoot that down. My two spawn hang back behind the two other PM
squads ready to protect the Biologus, Blightspawn and Plaguecaster from deep
strike shenanigans. I was particularly wary of the tower in the far corner of
the table as that was very, very obviously where the Vindicare assassin would
be sitting. I therefore made sure I placed my characters out of direct line of
sight just in case Kraken stole the first turn.
This was a rookie error - everyone knows I can't roll for toffee, so deploying as though I might one day get lucky will never achieve anything. My plan was to keep a variety of small units in deep strike, to be struck where I needed them, and keep a backline defence team to protect the Vindicare. Everyone else was in the transports, ready to zoom forward and grab objectives as best as possible.

And sure enough, I stole nothing. Game on!
Turn 1
 |
| As mentioned, the maps are a fairly rough guess at what happened - for example, the two fliers didn't get quite this far forward in this turn. But it's relatively accurate! |
Fortunately
I did get to go first so moved most of my troops forwards. In the psychic phase
I discovered one of several rookie mistakes I’d made: I’d given the power
Putrescent Vitality (+1 S and T) to the DP, intending to either buff his
strength to 8 or the FBD’s toughness to 8, only to discover as I picked up the
card to cast it that it can only be used on infantry.

I think that some scions were in range of a smite however, so that was OK. which meant that I could put some shots into the Valkyrie from the Helbrute (firing twice using the Fire Frenzy stratagem as he’d stayed put on his little hill). The PBC had moved forwards which meant that the five hits from its mortar needed 5s to hit. Despite the volume of fire I only put three or four wounds onto the Valkyrie.

I think that some scions were in range of a smite however, so that was OK. which meant that I could put some shots into the Valkyrie from the Helbrute (firing twice using the Fire Frenzy stratagem as he’d stayed put on his little hill). The PBC had moved forwards which meant that the five hits from its mortar needed 5s to hit. Despite the volume of fire I only put three or four wounds onto the Valkyrie.
Well, that's what happens when you use a mortar to shoot at a jet plane!

In my turn, I stuck to the plan, sending the transports as far forward as I could. My draw had given me a reasonable spread of stuff, including the chance to grab the objective in the northeastern woods, and I plonked a large squad of Scions over it courtesy of the Valkyrie's drop ability. This is usually risky (jumpers die on a 1) but I could render it safe by using one of the special Vigilus strategems - 1 CP to put everyone down safely. In the middle of the woods, opposite an unkillable tank.

Shooting was okay - most of the cultists evaporated either to gatling fire, volley guns or morale, and I put a decent slap of wounds on the bloat drone and daemon prince. But they were getting close fast, and I wasn't confident about weathering much of a return strike.
VPs: We were about even by this point, something like three all. Pootle had defended something, I'd grabbed First Strike and an objective. Neither of us recall exactly what was scoring, though!
Turn 2

I moved the
plasma squad forwards so they could shoot at the Valkyrie, along with the PBC
(which continued to trundle towards the flier) and Helbrute (I didn’t realise
until the following morning that this time my use of Fire Frenzy on the
Valkyrie was illegal as although he hadn’t moved, the Valkyrie was no longer
the nearest target). Despite rolling five shots for the mortar once again, it
must have been distracted by the moving target and continued to drop explosive
plagues behind its target.
On my right, the FBD and Daemon Prince continued to advance so the DP could smite a daemonhost who had run forwards to act as a speedbump. I think I killed it in short order – it must have been a Tzeentch daemon loathed by my DP. I was conscious that these two were rather exposed; they were meant to act as distractions so my PM squads could advance behind them, but I was hoping I could get one of them to take out the sniper assassin before bringing out my characters.

In the middle, my other two squads of plague marines started coming out of the cover of the central building, taking advantage of the distracting presence of the FBD and DP in front of them. One of the spawn accompanied them whilst the other stayed with the plaguecaster on the left.
 |
| Ah! The Daemonhost! He didn't make it into the maps. Which doesn't matter, he did absolutely nothing in this game other than knock a lone wound off the DP. |
On my right, the FBD and Daemon Prince continued to advance so the DP could smite a daemonhost who had run forwards to act as a speedbump. I think I killed it in short order – it must have been a Tzeentch daemon loathed by my DP. I was conscious that these two were rather exposed; they were meant to act as distractions so my PM squads could advance behind them, but I was hoping I could get one of them to take out the sniper assassin before bringing out my characters.
In the middle, my other two squads of plague marines started coming out of the cover of the central building, taking advantage of the distracting presence of the FBD and DP in front of them. One of the spawn accompanied them whilst the other stayed with the plaguecaster on the left.

Seeing these obliging targets presenting themselves, I did my best to eradicate them. This meant dropping the boys in, and I quickly formed a kill zone round the flying foe, as well as setting out scion squads from the Tauroxes.

The Scions in the north had been battered by plague spray, and didn't do much in return, but the Valkyrie scorched a few wounds off the Hellbrute, and I finished off the cultists as well. The Daemon Prince and Drone perished in a hail of melta, sniper and plasma fire, and I felt pretty good about it. Then I realised that the rest of the army were all still entirely fine, and tromping across the middle of the board ready for action. Still, I'd achieved an objective or two on the way (no idea what), and the pegging was still very level. Everything to play for!

The Scions in the north had been battered by plague spray, and didn't do much in return, but the Valkyrie scorched a few wounds off the Hellbrute, and I finished off the cultists as well. The Daemon Prince and Drone perished in a hail of melta, sniper and plasma fire, and I felt pretty good about it. Then I realised that the rest of the army were all still entirely fine, and tromping across the middle of the board ready for action. Still, I'd achieved an objective or two on the way (no idea what), and the pegging was still very level. Everything to play for!
Turn 3
 |
| The supercharge of the Spawn there is a map artefact, he'd actually been up near the north edge of the cantina all this time! |
On the left my PBC continued to push forward and got within spitter range of the Valkyrie and unloaded at it, causing a fair amount of damage. It fired five (again) mortar shots back over its shoulder towards one of the Tauroxes, but (again) most missed. My plasma squad also rapid fired at the Valkyrie and I think caused quite a few wounds.
Yeah, it wasn't looking too clever by this point. But I didn't mind - they soak up fire like nobody's business, Valkyries, which to me is half their value!

The bolter-armed troops must have fired at the Scions that had been dropped off by the Valkyrie and (judging by the photo I took, showing no Scions there), must have killed them all – I suspect that I’d shot at them in the previous turn when maybe the Valkyrie was out of rapid fire range. The other two squads of marines on the right moved forwards towards the smoking remains of the FBD and DP.

The flail-armed squad moving towards the Scions near the battlecannon Taurox in the centre and the other moving (with the spawn) towards the other squad (near the gatling Taurox) on my far right flank. In the charge phase, both squads of marines on my right needed charges of about 8” and both made them (with a command reroll on the right I think). That enabled them both to skip past the dangerous open ground without losses and get into melee with two Scion squads, who I think were pretty much destroyed, certainly the ones near the gatling Taurox who didn’t react well to the rolling wounds from the flails of corruption. I think that the spawn killed the officer of the fleet in close combat this turn, which also resulted in it securing the nearby objective.

All these charges had left me feeling very anxious, but not entirely so. The Enginseer, seeing the fate of the Fleet Officer, jumped right back in the Valkyrie and the two headed for a handy Defend objective in the backline of the Plague Marines, but took a scenic route to make sure I could pile extra fire on the Hellbrute.

That didn't achieve much! And there wasn't much else in range or LOS to shoot. At least the Vindicare was entirely preventing the enemy characters from engaging, they were all keeping well out of harm's way in the back line. At least I cooked a spawn with melta shots.

My deathdealing was mostly done in close combat this turn. The Malleus Inquisitor single-handedly murdered one squad of Marines, the Commissar and Ogryn slew the rest. That gave me some breathing space as well as some good VPs for Blood and Guts.
VPs: Neither of us are quite sure exactly. Pootle was up by one, we think, but it was still holding very close!
Turn 4

The PBC
moved to secure and defend the objective in the woods in the far left after
spitting some more damage into the Valkyrie and shooting the mortar at one of
the Tauroxes (once again I rolled five shots again, but they were mostly
inaccurate). The plasma squad had a good shot at the Commissar Lord and his Bodyguard, so overcharged their guns and mowed them down. They might have split fire and put a fair amount of damage into the
Valkyrie as it was at this point that I knocked it down to only a few wounds
remaining.
Actually, I think the Hellbrute fried it at this point, leaving the Enginseer to hop out of the wreck, take a tailpipe as a souvenir and head for the objective in the woods, which he started defending! Somebody managed to shoot out the Cannon Taurox around this point too, although it's possible it lasted a bit longer before being slobbered to death by the Crawler, neither of us are quite sure.
Actually, I think the Hellbrute fried it at this point, leaving the Enginseer to hop out of the wreck, take a tailpipe as a souvenir and head for the objective in the woods, which he started defending! Somebody managed to shoot out the Cannon Taurox around this point too, although it's possible it lasted a bit longer before being slobbered to death by the Crawler, neither of us are quite sure.

Defend that objective, the Enginseer would damn well have to. Pootle had a fantastic draw of objectives, giving him points for holding half the board as well as destroying three squads in the shooting phase and then also killing my Warlord. If I was to have half a hope of pulling even, I'd have to work hard. Not easy - I didn't have much left, and what I did was rather out of position after the early strikes on the Daemon Prince.
Still, I did what I could. The Gatling Taurox laid some tame fire on the Hellbrute, not quite finishing it off, and the Vindicare picked off some Death Guard from the tower, but it wasn't a good turn for me.
Still, I did what I could. The Gatling Taurox laid some tame fire on the Hellbrute, not quite finishing it off, and the Vindicare picked off some Death Guard from the tower, but it wasn't a good turn for me.

VPs: Pootle surged ahead here by a solid six points, and Kraken had been dealt a useless hand even after burning CPs to swap out Scour the Skies (the fliers were already dead)
Turn 5

I moved by spawn so that it was ready to advance to
either of the objectives in woods on my left hand side of the table if
required. I think that this was the turn that my Foul Blightspawn ran forwards
to get within range of the gatling Taurox and reduced it to a steaming pile of
goo with his plague sprayer (four hits at strength 10, each with a -3 save and
causing 3 damage did for it).

Yes, it was. That glue gun is a menace, and my Vindicare was extremely glad he was finally out in the open!

Yes, it was. That glue gun is a menace, and my Vindicare was extremely glad he was finally out in the open!

There were some rays of light in this turn for me - mostly the look on Pootle's face when he realised the Malleus Inquisitor had range to Dominate the Blightspawn. One quick brainwash and the wretch was hosing his own Warlord down!
Fortunately, the random plague-flamer rolled only strength 5 and two hits this time. Either one didn’t wound or I rolled several saves/disgustingly resilient saves so my warlord was left alive – I’m sure he took a couple of wounds though. I think the sniping assassin fluffed his shot at the Blightspawn (second roll of 1 to hit for him in the game).
Yeah, you'd think he'd have been waiting for someone to emerge from the cantina's cover with an eagle eye, but he'd obviously just been using his scope to check out the dancers inside from afar. Somebody finished off the Hellbrute around this time, though. Might even have been the stormbolter fire from the Malleus Inquisitor - all the re-rolls against chaos can really pay off.
VPs: Pootle had big game hunter, which he claimed having squished the Taurox; he also had kingslayer so added
another D3 VPs. This really extended his lead, and although Kraken scored a defend objective with the enginseer, he was a long way behind.
Turn 6

{the spawn charged and ate the Enginseer, everything else advanced slowly and murdered everything in its path - Scion melta squad and Malleus Inquisitor, whose acolytes perished to mortar shots}


In my last game last year, the Xenos Inquisitor de Vaulot had heroically charged a Daemon Engine in the closing moments to try and score some vital points. Then, he'd soaked up lascannon and battlecannon hits in defiance of the odds, and seeing as fate had pooped a Big Game Hunter into my hand in the last turn now, I tried valiantly one last time.

Nope - the Crawler utterly murdered him and his acolytes in a single spew of overwatch, and that left me with a lonely Vindicare on a tower. He did at least shoot the Blightspawn through his rotten head before sneaking away, but the game was over and I'd thoroughly lost.
Well, that was going well until it suddenly wasn't! Actually, I was mostly pleased with how I'd done here. I didn't find I was struggling wildly against Disgusting Resilience as I had last time I faced the Plague Marines, I'd shot down their big hitters and pinned the rest and then I'd had a few unlucky turns of unachievable objectives which left me in the dust.
All the same, hitting the Daemon Prince and Bloat Drone with everything I had was probably a mistake in hindsight. It meant my bolt was shot in terms of mobility, and surrendering the board that way handed the game over on a platter.

Nope - the Crawler utterly murdered him and his acolytes in a single spew of overwatch, and that left me with a lonely Vindicare on a tower. He did at least shoot the Blightspawn through his rotten head before sneaking away, but the game was over and I'd thoroughly lost.
Result - 16:6 to the Death Guard, a Major Victory!
Well, that was going well until it suddenly wasn't! Actually, I was mostly pleased with how I'd done here. I didn't find I was struggling wildly against Disgusting Resilience as I had last time I faced the Plague Marines, I'd shot down their big hitters and pinned the rest and then I'd had a few unlucky turns of unachievable objectives which left me in the dust.
All the same, hitting the Daemon Prince and Bloat Drone with everything I had was probably a mistake in hindsight. It meant my bolt was shot in terms of mobility, and surrendering the board that way handed the game over on a platter.
Good game, though, and excellent to face the highly-prepared and motivated General Pootle again after a great many years!
I really enjoyed my first proper game of 40k since first edition and had no idea which way it was going to go until turn 4’s objective draw went very well for me and very badly for Kraken. Kraken wasn’t the only general to be somewhat distracted by the potential menace of the Bloat-drone and Daemon Prince and pour fire into them at the expense of other units. In fact they didn’t last at all well in this battle, but their presence enabled me to spring the other units forwards, which wiped out several other units.
My MVP was probably the Crawler though as it managed to claim objectives and kill quite a lot of troops. However it didn’t achieve one of its principle purposes (indestructible fire magnet) as Kraken sensibly focussed his fire on other targets that he could kill. Thank you Kraken for an exciting game! Fight you again in twenty years?
Oh, I'll be back to get you before then, just you wait!
Can nothing withstand the gloopy march of the Pootle's Death Guard?!
ReplyDeleteWhat a resilient onslaught!
Great game guys.
Cheers!
DeleteFor someone claiming to be a Rookie, Pootle was hideously prepared. Nothing in anyone else's list surprised him, he knew exactly what he was doing with his own and had a very sound grasp of what would work and wouldn't.
I pity his son's Ultramarines.
In our defence, Pootle has had about 900+ blog posts of our armies, tactics and battles to study form.
DeleteAll I know about Death Guard is that I need to bring the world's biggest fly swatter next time.
...and I read them all Stylus!
DeleteI don't know what anyone can learn from reading my form, other than 'paint all the ones off your dice'.
DeleteThat's exactly what I did learn, except I extrapolated and decided to paint all the 1s, 2s and 3s off as well!
Delete