

Pootle here with a write-up of my second game at King in the North against a mixed Daemon list, led by a Bloodthirster.
Full details of the list I took up to Element is on my last post (along with the write up of my first game), but here's a summary:
Invasion Fleet Detachment
- Hive Tyrant: Heavy Venom Cannon, Monstrous Bonesword & Lash Whip. Warlord with Adaptive Biology enhancement
- Old One Eye
- Broodlord: Alien Cunning enhancement
- 10 Termagants: Devourers
- 10 Termagants: Spine Fists
- 10 Genestealers
- 3 Tyranid Warriors with Ranged Bioweapons: Venom Cannon, 2x Deathspitters
- Carnifex: Bio-plasma, Spine Banks, Carnifex Scything Talons, Carnifex Extra Scything Talons
- Tyrannofex: Acid Spray
1,250 points

My second game was against Chris_K and his Daemons:
- Bloodthirster
- Daemon Prince of Nurgle
- Rendmaster on Bloodthrone
- Skullmaster and 5 Bloodcrushers
- 5 Flesh Hounds
- 10 Pink Horrors
- Burning Chariot
Mission and Deployment
The mission here was a cracker: at the end of each round, whichever unit(s) control an objective roll a D3. That is how many VPs are won for holding the objective, but it's also the number of mortal wounds that are suffered (with no way of avoiding this using FNPs etc). If the player loses control of the objective after a unit is destroyed as a result then the enemy follow the same process. Vehicles and Monsters take D6 mortal wounds (but only gain the equivalent D3 score of VPs).
Unfortunately the vagaries of the table allocation meant that I ended up playing on exactly the same table that I'd been on for game one, however Chris was kind enough to let me swap sides so at least I had a fresh perspective.

My deployment was pretty similar to before: Gants will hold the two corner objectives whilst everyone else piles through the centre, led by the Genestealers who take advantage of their 8" scout move to get a head start (not shown in the deployment map)


I win the roll-off for first turn this time.
Turn 1: Tyranids

I was careful to warn Chris about my redeployment shenanigans and also that the Genestealers had an 8" Scout move. They accordingly bounded forwards to eye up a 9" charge on the Bloodthrone.

The T-Fex pumped its Acid Spray in the same intended direction and dropped the chariot down half a dozen wounds. I considered trying a long-bomb charge into the Bloodthirster as if the Stealers make the charge they'll easily tear the Rendmaster apart, but I don't want to get too greedy. In any event, they fail the easier charge even with a CP reroll. At least I'm sitting on the central objective...though not for long if that Bloodthirster has anything to say.


The Daemon Prince jogs across to the centre of the Daemonic lines as the Burning Chariot sweeps up the right flank (having made the righthand home objective sticky - we have a quick chat about this in the context of the mission rules and agree that it's fine to do this but the Chariot will still take the VPs and mortal wounds as if he was on the objective). The Rendmaster elects to stand still because if he moves then the T-Fex will overwatch it and could easily knock the remaining wounds off.
The main event is the Bloodthirster swooping towards and then into the Genestealers, scattering bodies with sweeps of its enormous axe. I dither a little bit about giving them a 5+ FNP using Rapid Regeneration and decide to give it a whirl though I'm not at all confident it'll help (not least because the axe blows are boosted to damage 3 by the presence of the Bloodthrone so I'll need to make two out of three 5+s to save anyone.
Chris has 14 attacks with the Great Axe of Khorne that will hit on 2s and wound on 2s (and he'll cause additional mortal wounds at the end of the phase for each 4+ on 8 D6s), however not only does he manage to roll far too many 1s for his liking, but my new red dice from Winters roll an awful lot of 5+ invuln saves. I fail all the FNPs but unexpectedly I'm left with three Stealers and the Broodlord still alive to fight back!
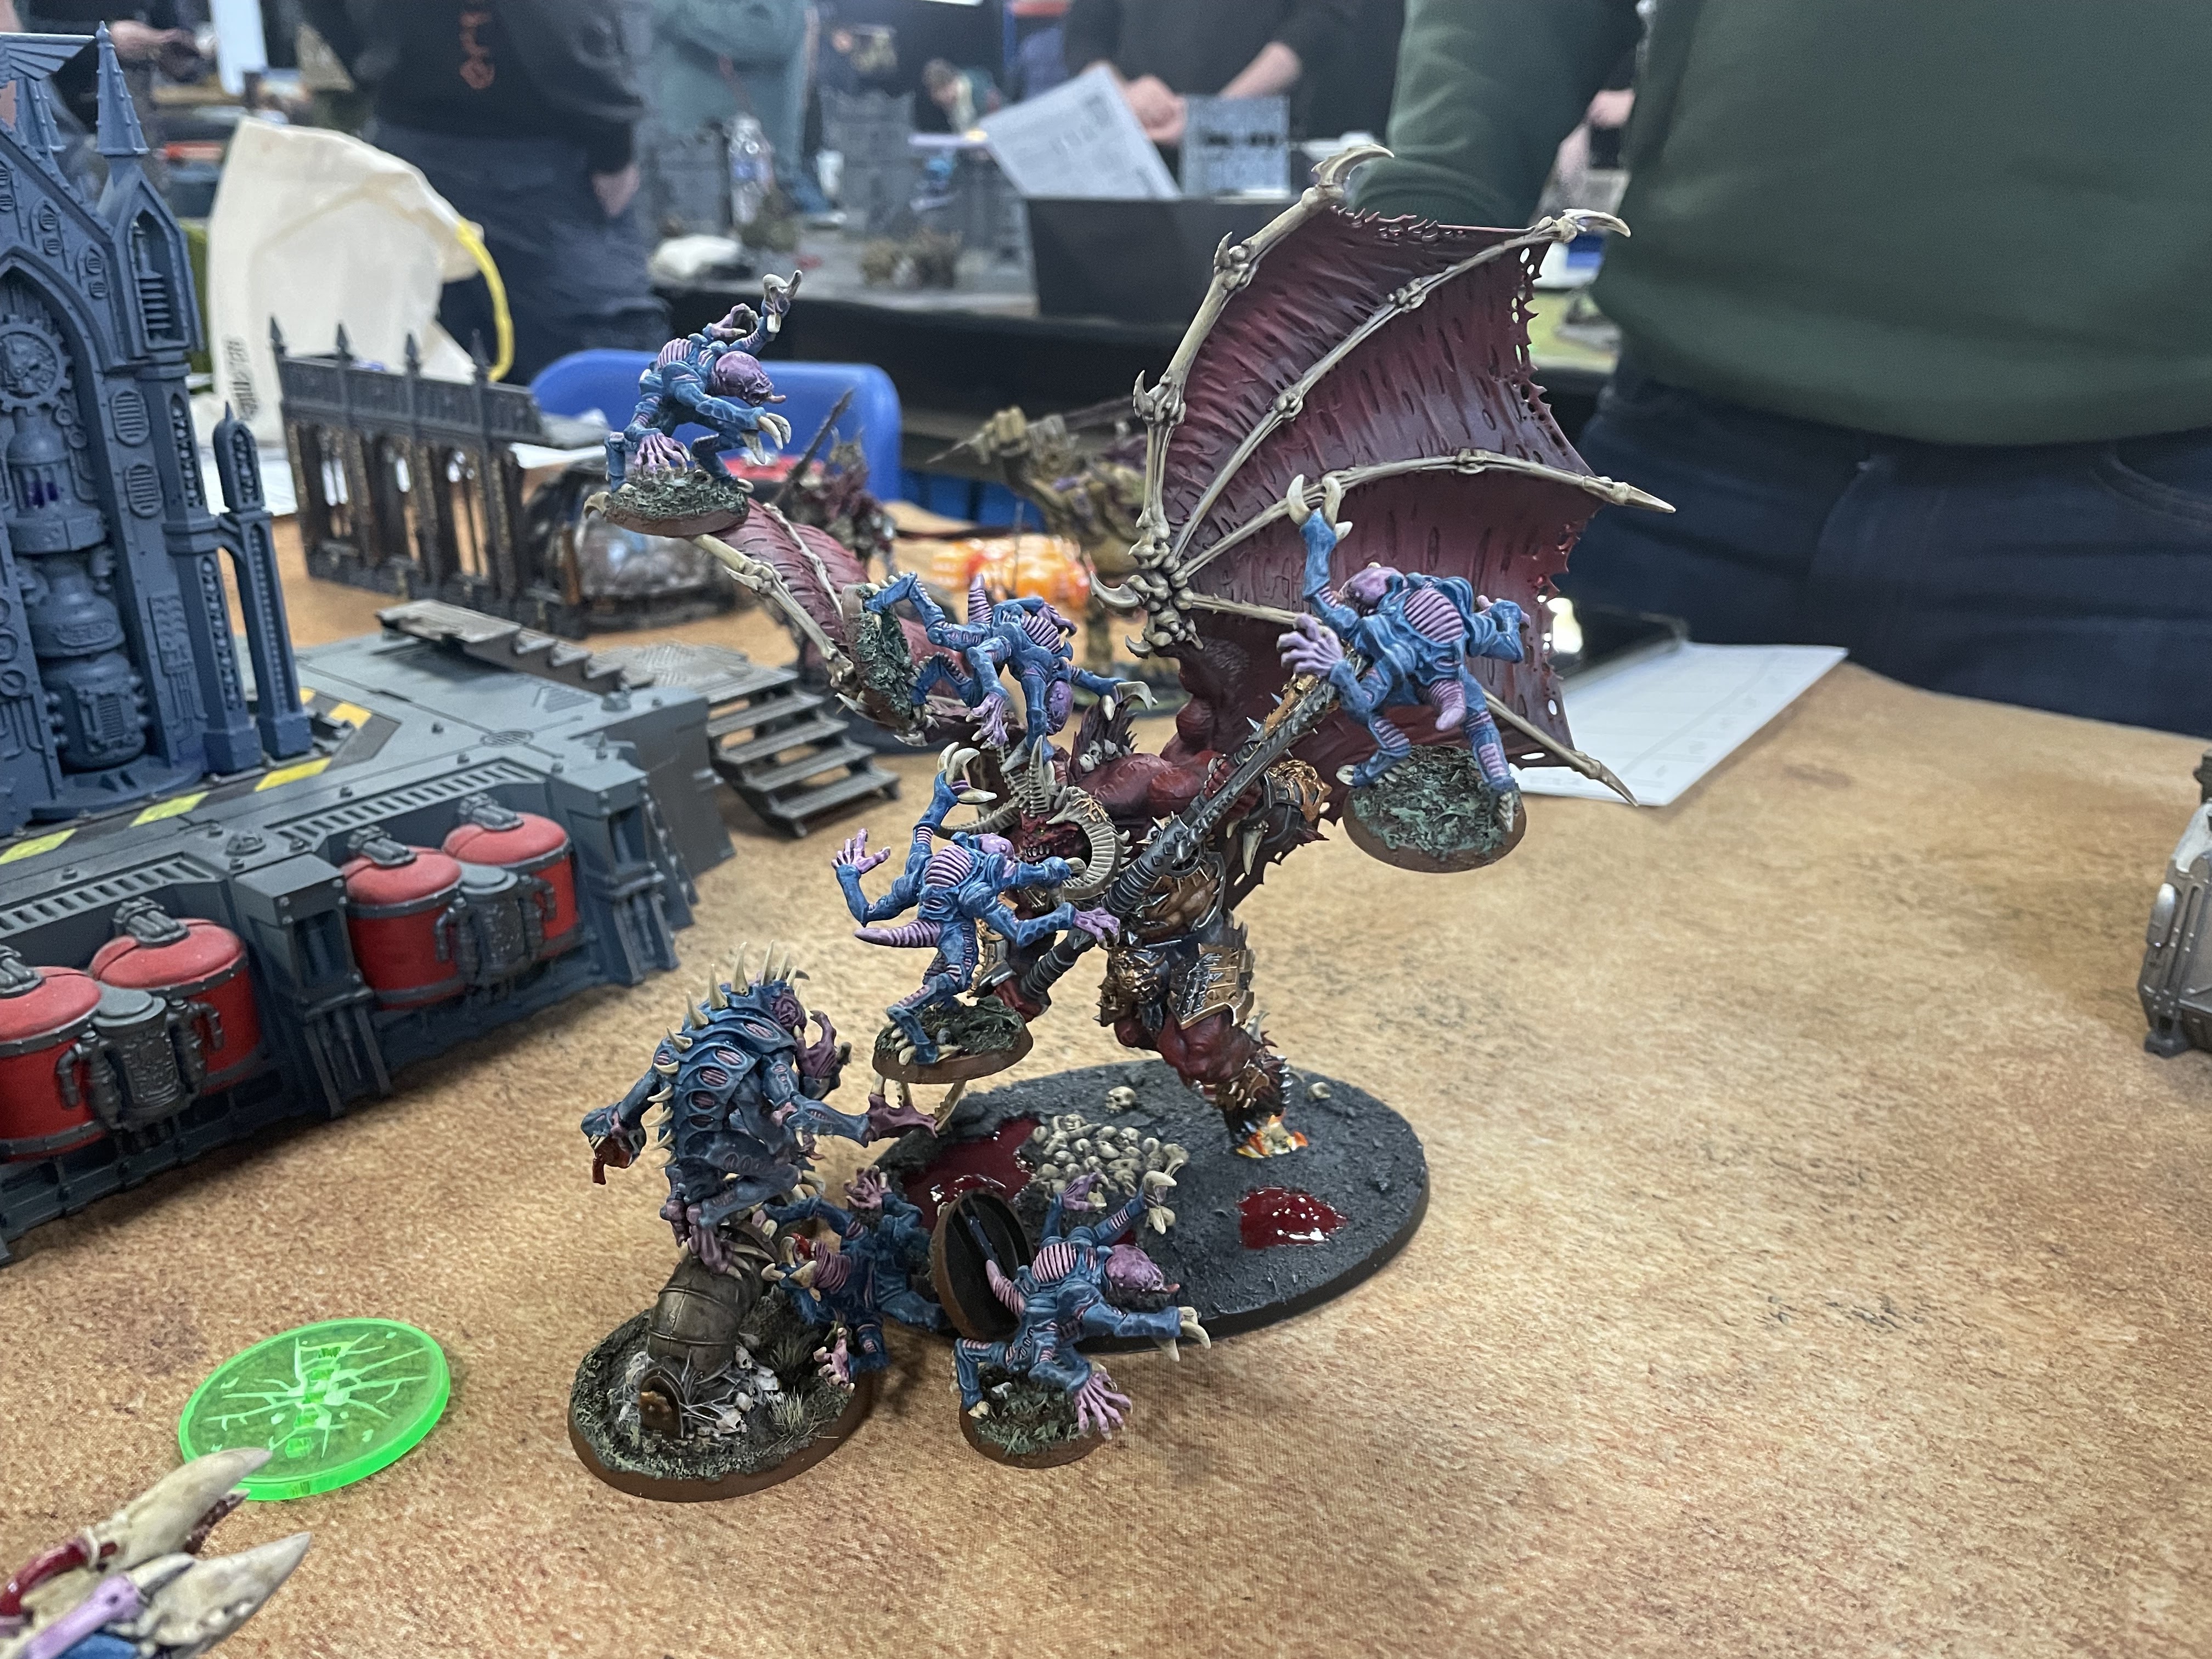 |
| I couldn't help myself and spent a minute or two trying to balance the Stealers all over the Bloodthirster trying to represent the swarm effect. |
And fight back they do! The combination of lethal hits on monsters and devastating wounds (granted by the Broodlord) plus hot dice-rolling drops the big Daemon all the way down to 3 wounds left. I can't believe my luck (and neither can Chris I suspect). The Bloodthirster's end-of-phase mortal wound bomb does kill all but one Stealer at the end of the phase but I'm extrenely happy with the exchange so far.
But the best is still yet to come: at the end of the round we roll up for VPs and mortal wounds. Because the Bloodthirster has killed most of the Stealers it controls the central objective. Chris rolls a 3 for damage which kills his warlord! The Stealers take a mortal wound themselves when they resume control of the objective (killing the last Stealer) but that is absolutely fine with me!
VPs: 4-3 to the Nids

My Gants stay put on my home objectives whilst I push forwards in the centre. The Broodlord can't quite believe his luck and heads towards the Rendmaster, however the T-Fex robs him of that target with a well aimed blob of acid.

The Broodlord therefore charges the Daemon Prince of Nurgle, bashing a few wounds off it.

He dies to the counterstroke, until I decide to spend a CP to reroll an invuln save and manage to keep him in the fight.

Turn 2: Daemons

The Burning Chariot heads towards the endzone, flaming the Gants eagerly as it approaches them. The combination of firey death and end-of-phase mortal wounds reduces the unit to just two models, but that's still enough.

On the left, the Pink Horrors make their objective sticky and move forwards in order to prevent the Carnifexes from charging them.

At the end of the phase the Bloodcrushers appear behind my lines but fail the charge on the Tyranid Warriors even with a CP reroll - Chris really is having a poor run of luck. The one thing that does go his way is that the Broodlord fails to bring down the Daemon Prince and is (finally) killed when the Daemon gets to strike back.

At the end of the round we roll a load more mortal wounds, including a fat 6 for the T-Fex on the central objective and the fact I've held the centre for two successive turns is starting to tell.
VPs: 11-7 to the Nids
Turn 3: Tyranids

Much carnage this turn: the Hive Tyrant and Warriors crash into the Bloodcrushers, knocking three of them over; the Carnifexes make short work of the Flesh Hounds. The T-Fex spurts over the Daemon Prince, but can't quite burn through the Nurgly rottenness. At the end of my turn, Chris plays a strat to drop the DP back into the Warp to reemerge next turn.
Turn 3: Daemons

Lacking options, the Horrors try to move block the Carnifexes to prevent them getting onto the rear left objective, but can't quite roll a high enough advance to achieve their objective.

The Daemon Price pops back out of the Warp near my larger unit of Gants but luck is still not with Chris and he fails the charge.

On the right, the Burning Chariot finishes off the surviving Gants on that flank and takes possession of my home objective. We decided that it can hold both that objective and Chris's home one, but will take mortal wounds for both.

At the end of the round Chris manages to roll high for the righthand objectives held by the Burning Chariot...high enough to knock all five wounds off the chariot and kill it!
VPs: 17-9 to the Nids

We run through this turn fairly quickly - the Carnifexes easily dispatch the Horrors and the T-Fex kills the Daemon Prince. The Hive Tyrant can't quite bring down the Bloodcrushers, but with only that unit left, Chris concedes.

Result: Victory to the Tyranids
Locker Room
Wow, I did not expect that. It has to be said that Chris had poor luck throughout the game - none of his big hitting units managed to do very much at all, apart from kill themselves in the exploding objectives!
I have to say though that seeing a unit of Stealers survive a charge from a BLOODTHIRSTER and then (effectively) take it down in return was absolutely crazy and probably the champagne moment from the entire day for me.
Thank you Chris for being a good sport and smiling throughout despite his poor luck - he was a great ambassador for the best advice I've heard in this game: enjoy your opponent's success.
Go Genestealers! Love that picture.
ReplyDeleteI'm not sure that Chris understood quite what I was doing but he let me spend quite a few minutes piling Stealers all over his monstrous daemon. If I could have shoved one into the Bloodthirster's mouth to suggest that perhaps it had choked to death on one I would have done
DeleteGreat result - that Daemon list looked tough!
ReplyDeleteThanks, I was intimidated by the Bloodthirster even before Chris told me how many attacks it had. I still can't quite believe it bounced off the Stealers!
Delete