
The Crypt Angels vs T'au

My Death Guard have fought both Kasfunatu's T'au and his Crypt Angels. Kas wanted another outing with the Crypt Angels and I, Pootle, fancied a go playing the "good guys" of the T'au, so we're going to complete the triangle, this time fighting on the Crypt Angels' home turf.
We're also trying out a virtual dice-rolling programme called RollD20 to see how it works "in anger". Particularly interesting is trying out programming in things like rolling 16 dice, rerolling 1's, needing 3+, which gets a bit complicated in real life.
T'au
I've played against Kasfunatu's T'au a couple of times so at least I have an idea of what the units do. But commanding them will really get me up the learning curve (I hope). I picked a castle of a Fireblade and three units of Fire Warriors and some Pathfinders to surround a couple of Broadsides (with High Yield Missile Pods and Advanced Targeting Systems as that gives me quite a lot of flexibility).
They'd be led by a Fusion Blaster-toting Coldstar Commander with Cross-linked Stabiliser Jets relic, which gives him a single reroll 1 to hit and wound each turn - very handy with only three Fusion Blaster shots going out. I'm going to start him in with the castle to declare Kauyon and then he will jump around the table blitzing any unprotected characters or key targets. To protect him on his jaunt, I picked a Remora Stealth Drone who would emerge from hiding when the Coldstar needed him. I added three Crisis Suits to jump in and cause trouble where they were needed along with a Ghostkeel armed with Fusion Blasters and a second relic, a Fusion Obliterator (3 Heavy Shots at 24" with all the strength, AP and Damage you could ask for). This last could deploy up close and personal with the Crypt Angels, but I wanted him to start just in front of my deployment zone as the various penalties to hit him should mean Kas will have to waste a lot of firepower against him.
Battalion detachment - T'au (T'au Sept)
- Coldstar Commander (HQ)
3 x Fusion Blasters, Shield Generator. Warlord: Trait - Exemplar of the Mont'ka
Relic: Cross-linked Stabiliser Jets - Cadre Fireblade (HQ)
- 5 x Fire Warriors (Troops)
Pulse Rifles, Shas'ui with Pulse Pistol & Markerlight - 5 x Fire Warriors (Troops)
Pulse Rifles, Shas'ui with Markerlight - 5 x Fire Warriors (Troops)
Pulse Rifles, Shas'ui with Markerlight - 3 x Crisis Battlesuits (Elite)
Shas'vre: 2 x Fusion Blaster, Shield Generator; 2 x Shas'ui: 2 x Burst Cannon, Advanced Targettng System; 2 x Shield Drones - Ghostkeel (Elite)
2 x Fusion Blasters, Fusion Collider, Relic: Fusion Obliterator, Counterfire Defence System, Velocity Tracker; Heavy Slugger; 2 x Stealth Drones - 5 x Pathfinders (Fast)
- Broadside Battlesuits (Heavy Support)
2 x (2 x High Yield Missile Pods, 2 x Smart Missile Systems, Advanced Targeting System); 4 x Shield Drones - Remora Stealth Drone (Flyer)
1,000 points, Power Level 61. Battleforged + Battalion - Relic = 7 CP

Crypt Angels
Kas went with a pretty mobile list, with Raptors, a Jump Lord and Bikers plus Terminators to teleport down to wherever they're needed. He must have been thinking that the T'au would form some kind of castle and sit tight and some maneovrability would come in handy!
Battalion detachment
- Chaos Lord with Jump Pack, Combi-Melta, Mark of Tzeentch (HQ)
- Sorcerer in Terminator Armour, Force Sword, Combi-Bolter, Mark of Tzeentch (HQ)
Prescience, Warptime. Warlord: Reader of Fate - 20 x Chaos Cultists (Troops)
Autoguns, 2 x Heavy Stubbers - 6 x Chaos Space Marines, Mark of Tzeentch (Troops)
Lascannon, Champion with Combi-Plasma - 6 x Chaos Space Marines, Mark of Tzeentch (Troops)
Reaper Chaincannon, Champion with Combi-Flamer - 5 x Chaos Terminators, Mark of Tzeentch (Elite)
Icon of Flame, Chainaxes plus Combi-Plasma, Combi-Melta, Combi-Flamer, Reaper Autocannon - Helbrute, Mark of Tzeentch (Elite)
Helbrute Fist, twin Lascannon - 3 x Bikers, Mark of Tzeentch (Fast)
Icon of Flame, Melta Gun, Plasma Gun, champion with Combi-Bolter and Plasma Pistol - 5 x Raptors, Mark of Tzeentch (Fast)
Icon of Flame, Melta Gun, Flamer, champion with Combi-Plasma and Chainsword
1,000 points, Power Level 60. Battleforged + Battalion = 8 CP

Mission and Deployment
We decided to play Strategic Gamble from CA18: each player draws three objectives but can swap two of them for a new one if they like; if the new is scored by the end of the turn, the score double the number of VPs. As per our standard house rules, we removed Domination and Priority Orders Received from the decks, allow redraws for any objectives that would always have been impossible, and also prevent Area Denial being scored in turn 1.
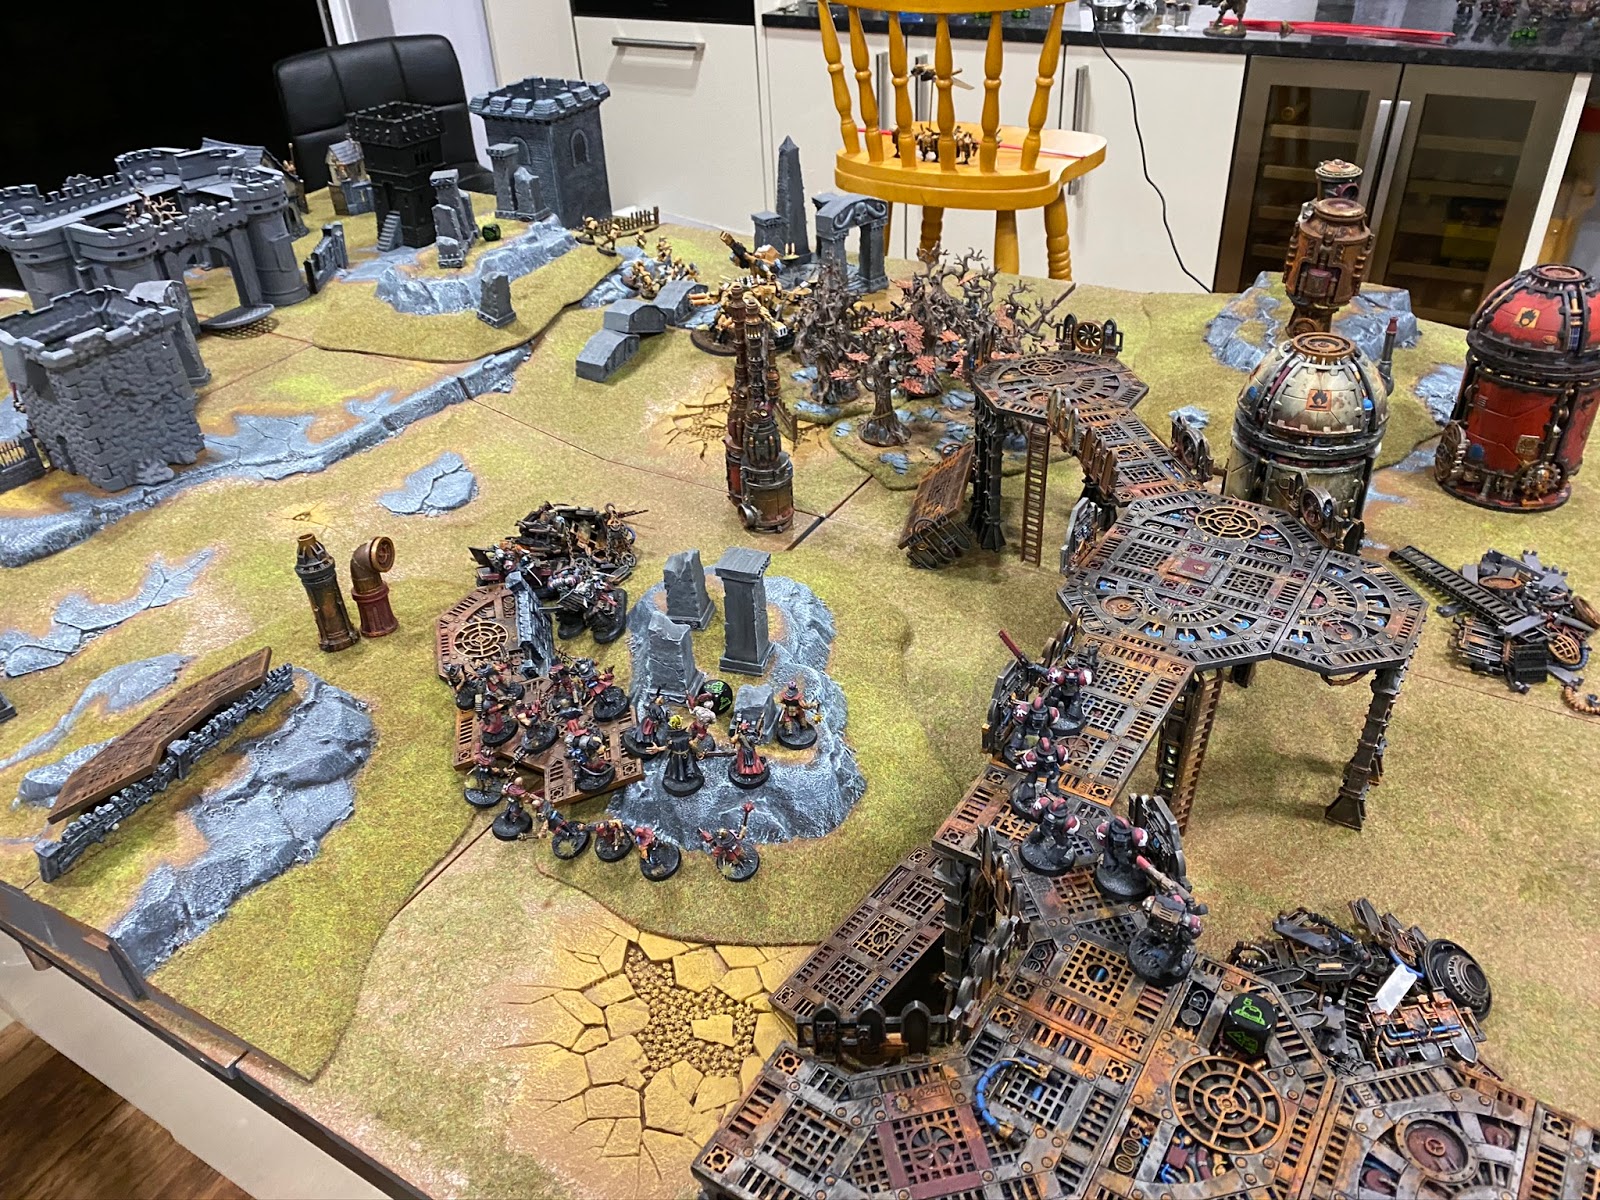
You may recognise the battlefield from another game Kas played recently. In fact this battle took place the previous day, I'm SO MUCH slower off the mark than Kraken in writing it up!

I won the roll-off to choose the set up and chose Frontline Assault (pointed deployment from the long sides) and picked the Southern side (nearest the camera - always a good bet on Skype battles!). I wanted to set up a castle in the middle of the board, but wanted to get as far forwards as possible so that my Broadsides (which only had 30" and 36" range missiles) would be able to hit as much of the board as possible.
Everyone, including the Ghostkeel, started within 6" of the Coldstar in order to benefit from Kauyon when it was called. Unfortunately my careful pre-game planning was about to be my undoing - I'd already made two big mistakes in putting the army down - can you see what they are yet?
Kas unsurprisingly opts to go first and I fail to seize the initiative, so off we go!

Crypt Angels Turn 1
Kas draws defend objective four (next to the Helbrute and Chaincannon Marines), Hold the Line and Blood & Guts to start with. The latter two are clearly not much use this turn so he immediately takes a Strategic Gamble, which pays off when No Prisoners comes up: that's much more achievable.
Kas starts off with a little shuffling around so that as much firepower as possible can draw a bead on the Ghostkeel. The drones die first to fire from the Chaincannon squad, and then the Bikers and Helbrute make short work of the Battlesuit itself. Ouch. That was far too easy. I should have tucked the drones out of sight up against the wall.
With nothing better to fire at, the Lascannon-armed Marine takes a potshot at one of the Broadsides, but one of the Shield Drones takes the hit (and dies in the process)

Objectives achieved: First Strike (1), No Prisoners (2)
VPs: 3-0 to the Crypt Angels
T'au Turn 1
My objectives are Area Denial (which I can't score yet), Defend Objective 3 (ha!) and Supremacy (normally a good one, but not when I don't intend to move anyone this turn). I therefore ditch Supremacy and Defend 3 (thinking that I might be able to shoot Kas out of the middle next turn) and draw...Blood & Guts (wonderful!).

I start off by declaring Kauyon as planned so all my shots will get a full reroll, apart from the Fire Warriors on the left who can't see through the woods so move forwards to the front.

At least I've killed the bikers for a solitary VP, but I had hoped to make more of a dent before the Crypt Angels reinforcements arrive. I end the turn by ditching Blood & Guts.
Objectives achieved: First Strike (1); Crypt Angels: Defend Objective 2 (2)
VPs: 5-1 to the Crypt Angels
Crypt Angels Turn 2
Kas draws Secure objective 5, The Will of Chaos (secure objective 3, which is underneath the Cultists) and Area Denial. Although it's not obvious from the map, I suspect that my Coldstar Commander must have been just within 6" of the centre to make him the obvious contender to be deleted this turn. Unfortunately the map for this turn has managed to get lost in the Warp so you'll have to rely on the words and pics.


Objectives achieved: Secure Objective 5 (1), Will of Chaos (1)
VPs: 7-1 to the Crypt Angels
T'au Turn 2
To join the live objective of Area Denial (which is going to be tricky with all those Terminators now sitting in the middle), I draw Advance (nope, don't want to do that) and No Prisoners. I check the rules and there's no requirement for having to swap the two objectives just drawn for a new one, so I discard Area Denial and Advance and get Defend Objective 1. Unfortunately I'm not going to be able achieve that in my turn, or even next turn, but given I'm 6 VPs down at the moment, I can't ignore a chance to get two, so three of the Fire Warriors sling their rifles over their shoulders and hotfoot it to the edge of the wood so they can try for it next turn.

Lastly the Crisis Suits drop down from the sky onto Objective 2, midway between the two newly-arrived Crypt Angel threats.

First off, I get a markerlight shot on both the Terminators and the Raptors. The Coldstar then once again demonstrates his proficiency by dispatching the Helbrute with ease. The accompanying Remora drops one of the marines standing nearby.
But the most impressive thing is the combination of the Broadsides and the Crisis Suits taking out all the Raptors and three of the Terminators. Very impressive stuff!

Objectives achieved: No Prisoners (1)
VPs: 7-2 to the Crypt Angels
Crypt Angels Turn 3
Kas draws secure objective 1 and defend objective 1, both of which were swapped for Big Game Hunter (which was unfortunately useless and hence discarded at the end of the turn). He also draws Claim & Despoil (take an objective off me).

The surviving Jump Lord leapt over to get within an easy charge of the Crisis Suits, whilst the Terminator Sorcerer moved sideways to get closer to the same target.


Objectives achieved: None
VPs: 7-2 to the Crypt Angels
T'au Turn 3
OK, at least Kas didn't get any further ahead on the VP count last turn. If I can get a good draw and kill as much stuff as I did last turn then I'll be back in the game.
I draw The Lure (kill something that made a successful charge last turn) and Secure Objective 2 to go along with Defend Objective 1 that my Fire Warriors are heading for. I start of advancing them to tuck in behind the ruined building as far out of sight as I can. That's a good start.
I had planned to kill the Sorcerer's bodyguard and then melt the Warlord, but my eye is now taken by the Chaos Lord who charged my drone and didn't manage to kill it. If I kill him then I'll get both The Lure and Secure 2...very tempting indeed!

The Coldstar and Remora fly over to sit behind the Sorcerer's bodyguard, ready to pounce, and the drone falls out of combat but stays within 3" of Objective 2 so it'll be claiming it once the Chaos Lord is dead.

I start off with a markerlight into the Lord (I miss landing on on the Chaos Marines) and then I knock a wound off the Lord with some Pulse Rifles. Then it's time to unleash the Broadsides! This is clearly the time to split fire - 16 High Yield Missile Pods are more than enough to take down the Chaos Lord, I think, and that leaves 16 Smart Missiles to kill four Chaos Marines - also plenty! Oh such hubris...

Yup, the Lord survives on a solitary wound (after passing a rather spectacular number of invulnerable saves) and I also leave three of the Chaos Marines alive so I don't achieve either of the objectives and also don't get to kill the Sorcerer. In a fit of pique, the Coldstar does melt all three surviving marines, but's that's small consolation.

Objectives achieved: None
VPs: 7-2 to the Crypt Angels
Crypt Angels Turn 4
The new objectives this turn are Master the Warp and Assassinate (to join Claim & Despoil). These two objectives fit very nicely with Kas's plan for this turn to finally take care of the Coldstar. His warlord saunters over to position himself ready for a Smite and duly fries the Commander (with a super-Smite I seem to recall).

Meanwhile the Chaos Lord executes a cunning plan to shut down the Broadsides from shooting next turn but jumping in for an easy charge on one of them (after dispatching the annoying Drone on objective 2 over his shoulder). However the sheer quantity of overwatch gets through his invulnerable saves eventually and he falls.

In other news, the Remora drone also falls to fire from the Terminators leaving my footprint rather limited.

Objectives achieved: Slay the Warlord (1), Master the Warp (2), Assassinate (1), T'au: Defend Objective 1 (2)
VPs: 11-4 to the Crypt Angels
T'au Turn 4
I'm afraid that I can see that the game's over now. I draw some objectives just in case there's something kind, but I didn't even bother writing them down as they were unfortunately not.

I do take some speculative shots at the Terminators to see if I can at least salvage some pride but don't even manage to do that, so it's time to call it.

Final score: 11-4 to the Crypt Angels
Locker Room
Ow, that was painful.
In fact, it was potentially a lot closer than it looks. If I hadn't split fire and taken out the Sorcerer's bodyguard in turn 3, the Coldstar would probably have melted Kas's warlord. That would have made the endgame a lot more interesting: the Coldstar would've assassinated the Chaos Lord fairly easily and then the Broadsides should make short work of everything else.
But I did split the fire because I was (not unreasonably) chasing a couple of VPs. That's nature of the game, and I do like it.
Credit to Kas however for taking full advantage. I now REALLY appreciate how deadly a Coldstar Commander is, so well played!
I also agree that the RollD20 system is very interesting. It'll never replace proper dice, but I came into the game thinking that it would be much slower - it really isn't. For the simplest rolls, there's a single button to press, and more complex rolls are much faster, particularly as we tended to use the same rolls repeatedly. Kas said he could program in a suite of common rolls for an army that would speed things up even more. It's also helpful for Skype battles in some respects - Kas and I are old friends and trust each other to roll dice honestly (why would you play with someone you didn't trust?), but when his Chaos Lord made something like 9 invulnerable saves out of 11 to stay alive we did note that when the odds seem that long it's no bad thing to have clear proof (though Kas has a long history of being lucky that nicely balances the reliability Kraken has with rolling 1s - between them they roll about average). However despite all that, I can't help but feel the same way as I do when comparing eBooks to paper books: on most objective comparisons the high-tech version is superior, but there's just something about the physical object...
I've used Roll20 with Kas too, I'd back up this analysis. Although worth noting it's not just a dice app, it's an entire remote tabletop system for RPGs!
ReplyDelete