

Ninth Ed!
As the new era dawns, Orks are attempting to get a foothold in the ruins of an imperial refinery. Plenty of good scrap there, but something has already infested the septic tanks. Have the greenskins bitten into a rotten apple?
Yes, the rules for Ninth Ed are at large in the world. Although we'd picked our armies 8th Ed style, we decided there was no point hanging around. After fiddling the CP scores a bit, we picked one of the new Eternal War missions, puzzled out the new terrain stuff and cocked our guns!
Yes, the rules for Ninth Ed are at large in the world. Although we'd picked our armies 8th Ed style, we decided there was no point hanging around. After fiddling the CP scores a bit, we picked one of the new Eternal War missions, puzzled out the new terrain stuff and cocked our guns!
It's me, Kraken, in bold, and Pootle in standard type. Into the unknown!

Funny - I always loved Orks, and indeed used to collect them. But looking back, I never played as them in 8th. Is it strange to start the new edition with a new army?
Kaptin Krakkin's Klan o' Karnij

Funny - I always loved Orks, and indeed used to collect them. But looking back, I never played as them in 8th. Is it strange to start the new edition with a new army?
There are two detachments in here, because that used to get you more CPs, not less! We're fiddling that rule today, as a one-off draft dodge, so I will be starting the game with 5 after spending on on Da Biggest Boss on my Warboss.
He's not leading, that honour goes to the wicked Kaptin Badrukk. I'm taking Freebootaz as my main clan, and he's got a unit of Flash Gitz to boss about. Three large units of Boyz alongside them, with a Weirdboy and the excellent Da Jump power. There's also a Warbuggy to outflank and distract.
The other detachment is a spearhead of Grots Mobs, which gives them all invulnerable saves and rerolls of one to hit. A Big Mek to lead and protect them, then three Mek Guns - one each of Smasha Gun, Traktor Kannon and Bubblechukka. Probably not the best against Nurgle, but sure to be entertaining!
Battalion Detachment - Freebootaz
- HQ - Warboss with Da Biggest Boss, Rokkit Launcher/Stubba, Slugga, Power Klaw, Attack Squig and Cybork Body relic
- HQ - Kaptin Badrukk w. Warlord, Da Ripper, Choppa, Slugga, Ammo Runt
- HQ - Weirdboy w. Da Jump
- Troops - 17 Boyz w. Choppas and Sluggas, Nob with Big Choppa
- Troops - 17 Boyz w. Ditto
- Troops - 16 Boyz w. Ditto but there's one less
- Fast Attack - a Warbuggy
- Heavy Support - 7 Flash Gitz w. Snazzguns, Ammo Runt, Choppas and Sluggas
Spearhead Detachment - Gitz Mobz
- HQ - Big Mek w. Kustom Force Field, Choppa, Slugga
- Heavy Support - 3x Mek Guns, a Bubblechukka, a Traktor Kannon and a Smasha Gun as three individual units
998 Points, would really have 3 CPs but I'm taking 5 BEKOZ WE IZ ORKS AND WE TAKES WOT WE WANTZ
Nurgle Daemons

I’ve gone up against Kraken with Nurgle Daemons twice, once against a shooty Tyranids list and once with support from The Purge against the Mantis Warriors. I’ve finally painted up a 1,000 point list so wanted to get the whole thing on the table.
Naturally the list is centred around a blob of Plaguebearers with an assorted cast of buffing characters: Poxbringer for psychic support and +1 strength, Sloppity Bilepiper to allow me to roll two dice to try to take advantage of the Plague Banner and regain troops, and. Spoilpox Scrivener to add 2” of move, a +1 to hit in combat and exploding hits on a roll of a 6.
This central blob will be supported by three units of Nurglings to spread out, grab objectives and get in Kraken’s way: any time spent killing Nurglings will let my Plaguebearers get within charge range; and a unit of Plague Drones.
Lastly I added a Daemon Prince (like last game against the Death Guard, I’m using my newly-painted Jabberslythe model: even more appropriate for a Daemon army I think). He will be screened by three units of Furies, which I’ve found works really well in the past. I hope I don’t forget the change to character screening rules in ninth edition (spoiler alert: I do).
Battalion Detachment
- HQ - Poxbringer (Miasma of Pestilence)
- HQ - Spoilpox Scrivener, Relic: Corruption
- HQ - Sloppity Bilepiper
- Troops - 26 Plaguebearers; Daemonic Icon & Instrument of Chaos
- Troops - 3 bases of Nurglings
- Troops - 3 bases of Nurglings
- Troops - 3 bases of Nurglings
- Fast Attack - 3 Plague Drones
Outrider Detachment
- HQ - Daemon Prince of Chaos, Malefic Talons, Wings. Virulent Blessing. Warlord: Plaguefly Hive.
- Fast Attack - Furies
- Fast Attack - Furies
- Fast Attack - Furies
998 points, Power Level 56. Battalion + Outride would have been 9CPs in 8th vs 3CPs in 9th - but we compromise on 6CPs for both armies as a starting point.
Mission and Terrain

This is Eternal War!
We're playing Divide and Conquer. One of Pootle's lovely ruined refineries in the countryside, an old summer retreat I believe.
- Woods are being run as area terrain as the rules suggest - Light Cover, Dense Cover, Difficult Ground
- The refinery, after some discussion, is also area terrain. It's been given Breachable, Defense Line, Unstable, Obscuring, Light, Heavy and Dense Cover and Difficult Ground. This is a lot to wrap your head around, but basically makes it a big tarpit, slow to move through, hard to shoot people out of and good to fight over.
- Buildings are more or less impassable to either of us to make it easier on our brains
- Fences are just decorative today!
As you can see above, there's a cross of objective markers there. The Primary Mission is to grab them.
- 5 VPs for holding one
- 5 VPs for holding two
- 5 VPs for holding more than the enemy
These are scored at the start of your turn in the all-new Command Phase, starting from turn two (when we also gain a CP each turn).
We then each pick three Secondary Objectives in secret, declaring them at the start of the game. This is a tricky choice, there's lots I reckon the Orks can do! In the end, I go with:
- Domination - hold at least three objectives, scoring at the end of my turns
- Repair Teleport Homer - infantry in the enemy's deployment zone can basically skip a turn to perform this, scoring 5 points if they're still there in my next command phase. Should be a doddle with Da Jump!
- Engage on All Fronts - 2 points if I have units in three battlefield quarters, 3 if I have them on four, scored at the end of my turns
I decide to go with the following as my secondaries:
- Line breaker - 4VPs at the end of each turn that I have two units in Kraken’s deployment zone. I figure that between the Nurglings and fast-moving Furies, Drones and Daemon Prince, I should be able to get a couple of units into the scoring zone, and 4VPs per turn is quite a good return.
- While we stand, we fight - 5VPs for each of my most expensive models (DP, Scrivener and Poxbringer) if they survive the battle. Given the resilience of Nurgle Daemons and the fact that they’re all characters so are harder to target, I expect at least two will survive as long as I don’t forget the new character-targeting rules (spoiler alert: see above).
- Lines of Demarcation - a mission-specific one where I get 2VPs if I control the two objectives along the centre of the table at the end of my turn or 4VPs if I control both the one closest to my deployment zone and the one closest to Kraken’s. I figured that as I’d be trying to control objectives anyway, adding another bonus for doing so should be helpful.
Deployment

I get the choice of sides, and go for an entirely predicable denied flank-type affair, clustering the bottom left with Boyz ready to run in and go deep.

My two outliers are the Bubblechukka on the nice big hill and the Warbuggy in its flanking run.


My two outliers are the Bubblechukka on the nice big hill and the Warbuggy in its flanking run.

There are Nurglings all over the midfield, and although I know Pootle uses them to lure people into early charge range, I'm happy enough with that. I'm Orks! Even my heavy weapons boyz like a scrap, so the Flash Gitz go as far forward as I can, ready to storm the wood.

I’ve put the Plaguebearers in the middle and the Drones and DP on my right after seeing where the Flash Gitz go: this shooty unit could be really dangerous for me and both these units have 2-damage close combat attacks so can kill a model with one hit.

I’m torn about how far forwards to push the Nurglings, aware that if I don’t get first turn then they’ll allow Kraken to slingshot forwards onto multiple objectives, but if he doesn’t then I can move forwards and tie up a number of units, plus if he does charge the Nurglings then I can counter-charge with more dangerous units.

My son rolls a five in the roll-off for first turn, but Kraken unexpectedly finds a dice with six spots on it.

I’m torn about how far forwards to push the Nurglings, aware that if I don’t get first turn then they’ll allow Kraken to slingshot forwards onto multiple objectives, but if he doesn’t then I can move forwards and tie up a number of units, plus if he does charge the Nurglings then I can counter-charge with more dangerous units.

First turn to me, so let's get stomping!
Freebootaz Turn 1

Everything goes forward, pretty much. That's a nice, easy, Orky tactic. Not the Mek Gunz, they sit tight and flick the safeties off. If they ever had any, anyway.

Psychic phase, and the plan is to Jump a Boyz unit up into the top right gap, ready to start building a Tellyporta. Alas, I've made a classic Ork novice error and left the Weirdboy in the middle of too many excited greenskins. A nice big roll gives him perils, even after a reroll, and Pootle's been waiting for exactly that.

My head goes pop with a Daemonic Possession, and the resulting explosion kills the psyker and takes wounds off the Warboss and all three Boyz units. Nearly maximum for all of them, too, my dice are just as excited about 9th Ed as I am. At least the Warboss shrugs two of these with his Cybork Body.

After that, shooting isn't too bad. The nearest Nurglings get whittled to one base, the ones in the midfield lose a base too and I'm happy enough with that. The Flash Gitz and the forward Boyz then charge the Nurglings, wiping them out comfortably and leaving me holding two of the objectives.

Objectives scored: None
Nurgle Daemons Turn 1

Well, I've lost some Nurglings, but those Flash Gitz are looking vulnerable now. Both units of Furies on my right swoop down from the hill along with the Daemon Prince and Plague Drones, intent on charging into the woods (because all of them can fly they ignore the Difficult Ground reduction in movement and charging).
The Plaguebearers shamble (rather quickly) forwards towards the Boyz and the third unit of Furies push themselves forwards to just get within scoring range of objective B on my left.

The Nurglings on the left scamper forwards, intent on charging the Bubble Chukka.


The Nurglings do make a long charge into the Bubble Chukka, but (unsurprisingly) don't do any damage.
The Boyz cut down three Furies before we get the Morale phase. Kraken is all set to spend 2CP to auto-pass morale when we realise that, although they're bound to fail, the are extremely unlikely to lose all five remaining Orks. So the new rules have saved a couple of CP right there; very nice!
At the end of the turn I have scored the lesser Lines of Demarcation objective.
Objectives scored: Lines of Demarcation - 2
2:0 to the Nurgle Daemons
Freebootaz Turn 2

With those handful of lucky Orks surviving the first rush, my plan is clear. The two Boyz units break right, putting the barbed wire snarls of the refinery between them and the Plaguebearers, and the Warboss runs alongside them. This lets the unit that was already on the objective to advance, stay in range of his aura and later charge the Furies round the corner.

The Warbuggy appears in the back left corner, so I've got units in all quarters now. Good for scoring, that.

The Warbuggy appears in the back left corner, so I've got units in all quarters now. Good for scoring, that.
The big money goes on Unstoppable Green Tide - the Boyz in the middle leg it, but their identical twin cousins appear in the back corner and immediately start building gubbinz. I'm not letting my plan die with the Warphead!

The Flash Gitz are locked in combat, but they're happy enough. Shooting proves a total bust, the Warbuggy plinks a single wound off the Plague Drones and everyone else bounces of Daemon auras. Combat is also all too predicable - the Bubblechukka and Nurglings slap pathetically away at each other, while the Flash Gitz die just as fast as the Furies do.

Scoring - I'm off the mark! At the start of the turn, I had a single primary objective to Pootle's two, but that's still some loose change.
8:2 to the Orks
Nurgle Daemons Turn 2

I kick the turn off by scoring 10VPs (5 for holding one objective and 5 more for holding two), as well as gaining a CP (I like this idea).
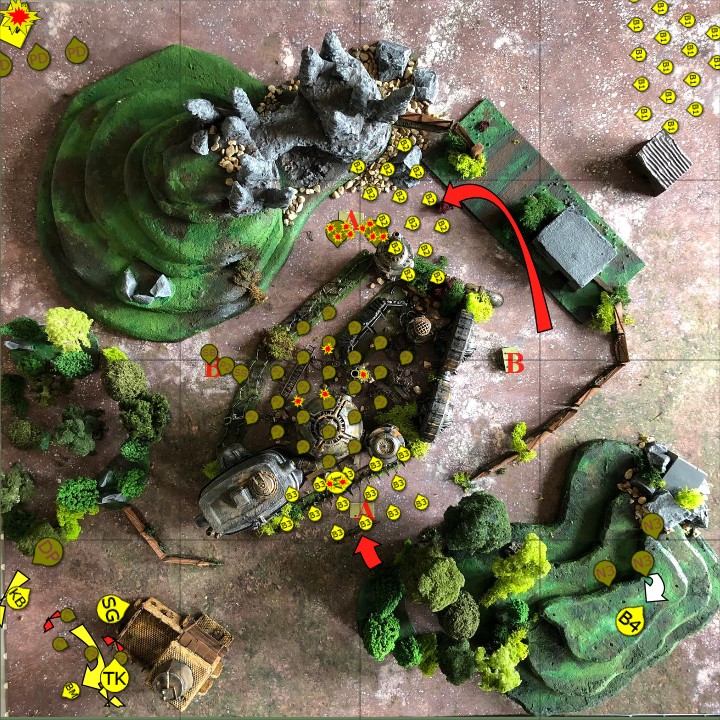
In order to score Linebreaker at the end of the turn I need to get at least one more unit into the Ork deployment zone. Although I won't get any points for killing the Ork warlord, he's a dangerous fellow and it may be worthwhile shutting down the Mek Gunz too. So the Daemon Prince flaps his decaying wings and lands next to Badrukk, whilst his Fury bodyguard screen him from the artillery pieces.


The Plaguebearers start tripping their way through the central ruins, heading towards the warboss, whilst the three supporting characters run forwards to support them. The Poxbringer positions himself so that the warboss is the closest visible target, and duly Smites a wound off him in the psychic phase.

I toy with a second Smite into Badrukk, but decide that the DP will cast Virulent Blessing on himself, but he fluffs it. This is important, because he also manages to fluff several wound rolls and Badrukk goes on to save enough wounds to leave him on a solitary wound.

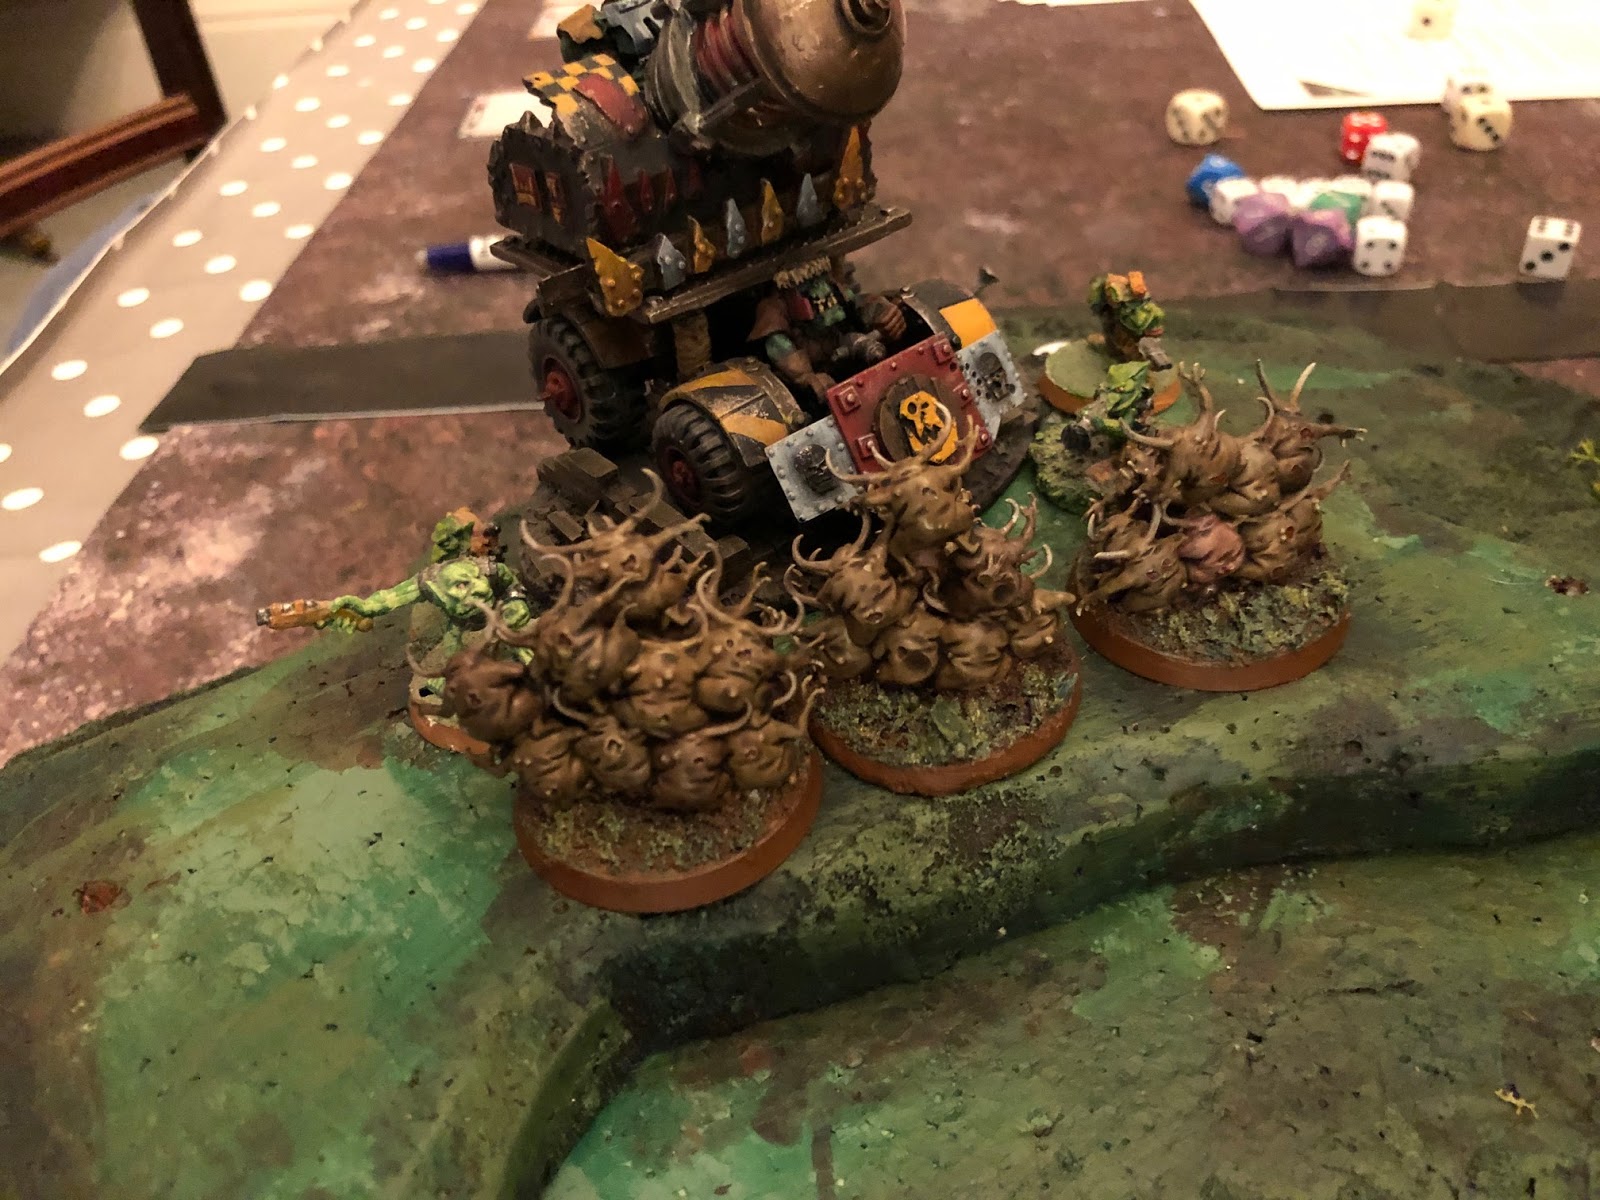
Meanwhile the Plaguebearers charge into the Warboss, but because of the narrow gap between the rusty structures, only four of them can get close enough to strike and don't manage to put any damage onto the tough Ork.
Objectives scored: Primary mission - 10, Linebreaker - 4
16:8 to the Nurgle Daemons
Freebootaz Turn 3
Build that Portal, Boyz. We'z gunna need it.
Well, I'm surprised to have as much left as I do, but happy to use it. The corner guns fall back as the Big Mek fixes the dents out of them, and Badrukk tiptoes away, not quite believing his luck. I also pull the Bubblechukka out, I may as well drag that out as long as possible.

As the Warbuggy dies under a heap of giant bloatflies, I charge some of the Mek Guns back into the Furies. Those battered losers can't take a big gun to the face! In fact, I don't even fall the Traktor Kannon out of the fight it was already in, as it can still shoot there (it's a vehicle, and that's a thing!). This doesn't have any effect, nobody hurts anyone, but it's fun.
In the middle, the Boyz back their Warboss up by charging in and putting a decent bit of killing into the Plaguebearers, who concentrate their limited attacks back on the Warboss and don't quite kill him. The other Boyz kill all the Nurglings with glee.

Then the wretched Plaguebearers start rising up again, thanks to their damnable banner! With all their buffs, they really are an incredibly tough unit to deal with. Hey ho - it's a good turn for scores, at least!
25:16 to the Orks
Nurgle Daemons Turn 3

Because I lost those Nurglings I only control one objective, so only 5VPs for the primary mission. This is something I need to keep an eye on. I like my position, but Kraken could yet score more VPs with three units of Boyz still on the table.
The Plague Drones fly as fast as the can back towards the action, and in the opposite corner the Nurglings continue their game of...well, not cat and mouse, more like mouse and mouse - Gretchin v Nurglings isn't the most impressive match-up.
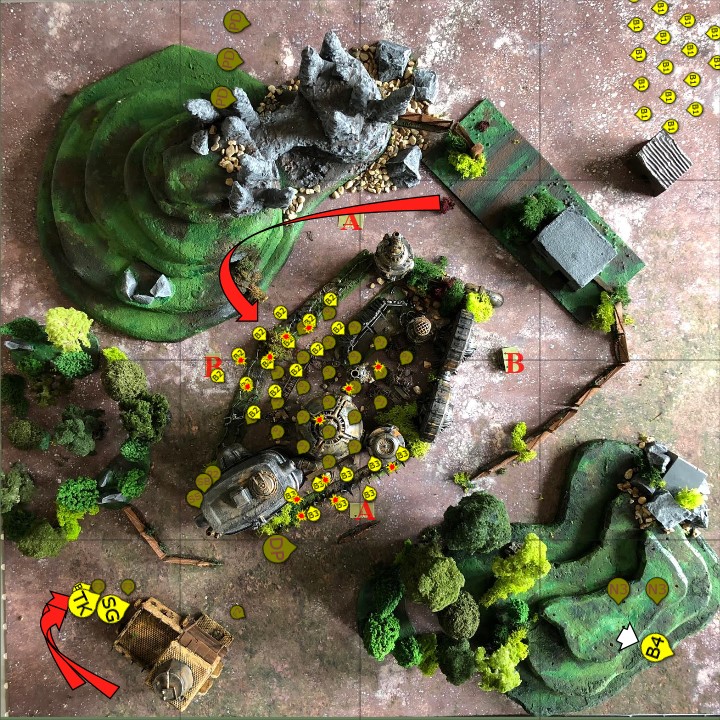
I want the DP to charge into the back of the Boyz on objective A, but I want to kill Badrukk before I do so, so I don't fly as far as I could and, with a bit of careful positioning, make sure I stay closest to the Flash Git so I can throw a Smite back over my shoulder. Just in case that doesn't go off, the Poxbringer (and his two accomplices) move forwards and positions himself for the same trick (the map doesn't quite show the relative positions accurately).
All that planning is somewhat wasted when the Daemon Prince decides to pull a super-Smite out of the bag - which, given Badrukk only had one wound left, is a little OTT.
 |
| Can you see what I've forgotten? Even when I took this pic I didn't see it... |
The DP does (just) make the charge into the Boyz and rips five of them into tiny green pieces, but there are still enough Orks to take half a dozen Plaguebearers down. However the four at the front finally manage to kill the Warboss. Despite this good news, they go on to fail their morale test, but, as I've got plenty of CP and little to spend them on, I reroll and hang in there.
Objectives scored: Primary Mission - 5, Linebreaker - 4
25:25 neck and neck
Freebootaz Turn 4
More hammering and tinkering from the top corner. They're doing well, we'll have the floors down by the end of the week if the timber arrives from the supplier.
Those Plaguebearers in the middle, they're not exactly where I want them. That would be on a different planet, stuck inside a null zone. But it's as good as I can hope for, so I charge them from behind, sluggas ineffectually blazing on the way in.
The Bubblechukka carries on playing tag with the Nurglings, but the other two trundle round the corner where they can see a nice fat Daemon Prince. Who is totally unscreened in this new edition!
I had tucked a lone Fury into the doorway of the building so he'd be closer to the Mek Gunz but safe from their fire. But even if I'd remembered to put the Furies nearer to the DP, because both units had fewer than 3 models they wouldn't have been able to screen him anyway.
So he cops a Traktor Kannon to the face, although luckily his daemon save keeps him in one chunk.
The Smasha Gun has to fall out of combat to shoot, so doesn't bother. I'd rather chip away Furies than do nothing, and the Big Mek and Traktor then charge in to help. They don't achieve anything, sadly.
And it's a mistake to have whiffed with them first, because then Pootle interrupts with the Plaguebearers!
This takes a huge dent out of the smaller Boyz, which is bad, but does at least protect them from the Daemon Prince. The other unit also take quite a few hits, and my counterstrike is rather dulled as a result. A mere three Plaguebearers go down!
They fail their morale badly, though, on box car sixes, and Pootle spends a reroll to get round this. It doesn't help him, it's still a fail, and the dice gods reap a toll of another three Daemons as I've just managed to get them to half strength. This is good news, but I'm still not as far ahead as I'd like to be. Still scoring, though.
47:25 to the Orks
Nurgle Daemons Turn 4

Although I killed more Orks than I should have done last turn by virtue of Kraken forgetting to go with the Boyz first, he did take me off Objective B. However completely unintentionally, we realise that my front three Plaguebearers outnumber the two remaining Ork Boyz on Objective A, so I do still score 5VPs for the primary mission.
What I should have done now was make sure that I stuck the Plague Drones onto the rear Objective A so that I could control multiple objectives in my next, and final turn. Will that be critical? However despite falling behind on the VP count, my blood is up. Everyone positions themselves for a charge into the remaining Boyz in the centre.
With a little CP assistance, the Daemon Prince Smites the two remaining Boyz near him away (freeing up the Plaguebearers to charge into the other Boyz later on).

I decide to let the Plaguebearer characters go first, and between them they duly dispatch the remaining Boyz, so I don't need the assistance of the Drones or Plaguebearers.
Objectives scored: Primary mission - 5, Linebreaker - 4
47:34 to the Orks
Freebootaz Turn 5

It's not looking great here, but there's still hope. Those poor Daemon characters are wide open to a bit of cheeky shooting from the Cheeky Gitz.
But in the event, it's not quite enough - the Traktor Kannon plings a pair of wounds off the Daemon Prince. It's tempting to shoot him again, but with that protective Miasma on him, I don't reckon I'll get the hits. So I gamble on Smashing one of the support guys. It's close! Two hits and four wounds through could do him. Not with disgusting resilience, of course, and I close on a quiet turn.
54:34 to the Orks
Nurgle Daemons Turn 5

I do control two objectives at the start of my turn, and that's also more than the (zero) objectives that the Orks control, so I score the full 15VPs at the beginning of my turn.
Because it's getting late, all I do is move the Plague Drones onto the rear Objective A (not shown on the map) so that I also claim the superior Lines of Demarcation secondary objective.
That wouldn't quite bring me level with Kraken's score, however at the end of the game I also score the full 15VPs because all three of my senior characters survived.
Objectives scored: Primary mission - 15, Lines of Demarcation - 4, While We Stand, We Fight - 15
Result: 68-54 to Papa Nurgle!
Orker Room
Well, if that's Ninth, I like it!
From what I hear, one of their aims to make quicker, smaller battles baked in. Not sure we managed that (nearly six hours!), but quite a bit of that was rules wrangling, and that always gets faster.
As well as discussing the new rules, I'm afraid I was also slow at moving all the models around on my (pretty, but rather unstable) terrain.
Terrain feels useful and important suddenly, I love the new CP system, don't miss Overwatch and really like the targeting changes to characters. Lots to learn in there!
Yes, we tried to keep things relatively simple on the terrain front, but spotted a few of the major changes as we went through. The two big ones for us were the change in morale, which led to both your Boyz and my Plaguebearers hanging around for longer after failing morale tests, and character screening. Looking back, I think you could have targeted the DP with the Traktor Kannon in turn 3 as I think both units of Furies were two-strong at that point so weren't actually screening the DP.
I do feel that a really critical point was your Weirdboy going pop in turn one.
That headburst really cost me some good options. Denies, smites and Jumps would all have been very handy in the mid-game. I probably put the buildy boyz a bit far out of the game, too - a bit closer might have been more tempting to pull Pootle's units out of place, whilst still making it very hard to stop them scoring.
I want to apologise to Kraken for something we only realised after the game: for some reason I thought my Plaguebearers were T5 (I suspect I thought they were Plague Marines). This would have made a difference during the melees with the Boyz so they shouldn't have survived the game. I'm sorry about that.
I want to apologise to Kraken for something we only realised after the game: for some reason I thought my Plaguebearers were T5 (I suspect I thought they were Plague Marines). This would have made a difference during the melees with the Boyz so they shouldn't have survived the game. I'm sorry about that.
No worries at all! I also should have spotted this, it's not like I haven't played against them before, but with late nights and new rules whizzing about, I missed it myself.
Writing up this report made me realise how little I'd paid attention to scoring the primary objectives during the game. Especially with a durable army like mine, I should have been able to focus more on protecting a couple of objectives. At the time we also both missed both occasions when we fulfilled the "hold more" objective and scored the full 15VPs (we both only gave ourselves 10 during the game). Being aware of that kind of thing is going to be really important in 9th (I guess people familiar with ITC rules are used to this).
Writing up this report made me realise how little I'd paid attention to scoring the primary objectives during the game. Especially with a durable army like mine, I should have been able to focus more on protecting a couple of objectives. At the time we also both missed both occasions when we fulfilled the "hold more" objective and scored the full 15VPs (we both only gave ourselves 10 during the game). Being aware of that kind of thing is going to be really important in 9th (I guess people familiar with ITC rules are used to this).
But the main problem was that I didn't manage to score Domination even once. A different objective would have been a better idea - probably a killy one, in retrospect. All the same, it turned out to be a pretty close game (if I'd just cracked one of those characters in the last turn!), and I really like being able to control your mission and objectives in this way.
I did enjoy the Schemes of War variant in Maelstrom missions from CA19, which removed some of the randomness of the card-based system, but the objective-based mission does look a lot of fun.
I did enjoy the Schemes of War variant in Maelstrom missions from CA19, which removed some of the randomness of the card-based system, but the objective-based mission does look a lot of fun.
Not that I don't miss Maelstrom cards, I was fond of them (and the money I spent on them, fool that I am!), but the reliability makes the game feel more of a skill challenge somehow, which is nice even if I lacked that skill today!
Of course, there's nothing to stop us continuing to play Schemes of War missions with the Maelstrom cards, though I am keen to continue investigating the "official" missions. Overall though it's a definite thumbs up from both of us for ninth. I'm looking forward to getting stuck into this edition. And maybe starting a new army - I'm quite liking the look of the Necrons in the Indomitus box...
Good game, and interesting changes - looks like I won't be using a D12 to keep track of the VPs any more!
ReplyDeleteI knew someone who had an honest-to-god D100 years ago (not two D10s): that could be handy (if a little unstable).
DeleteExcellent battle report as always, was wonderful to read about both of your first impressions of 9th! One very minor thing to note is that, as afar as I'm aware, the CP re-roll has been neutered in terms of what it can be used for, and can no longer be used to re-roll a morale test. Very much looking forward to more battle reports!
ReplyDeleteThank you! 9th-ed rules error number 1! It's little things like that that are hard to spot.
DeleteWell, the Dice Gods had you covered there. The morale test in question was box cars, rerolled to a six and a five. And you got a second box cars for the same unit the turn after!
DeleteJust when you *don't* want to roll high...
Delete